
MSFS: Hardware etc
This page contains notes on hardware and software that is one step further from the sim and windows settings.

Page Contents
Turn Hyperthreading On
Note: AMD has something akin to it called Simultaneous Multi-Threading (SMT).
Hyperthreading allows two primary threads to be assigned to one physical CPU core, and each hyper thread represents one logical CPU core. There is some hardware support built onto the CPU to make the overhead of task switching worth doing and the net effect for general statistics is a gain of up to 30% efficiency. This is a good gain for general computing, and makes a lot of difference for single, dual and quad core devices.
If the running hyper thread in each physical core needs to pause for any reason, it can hand over control to the other hyper thread to ensure that the CPU is fully utilised. These gains make a hyperthreaded system more efficient than a non hyperthreaded system.
You will know if your hyperthreading is turned on or off by looking at the performance tab in Task Manager where there will be a graph running representing the load on each core. If you have double the number of cores you bought, that means Hyperthreading is turned on. In order to turn it off you will have to enter the BIOS to disable it.


How Much VRAM Do You Need?
MSFS in VR needs a lot of VRAM. One of the most persistent stutters you will be faced with will be due to the lack of VRAM on your GPU. Each stutter will be caused by data being replaced in the VRAM as you fly over a region. This stutter may also persist if you have an active RAM drive for a rolling cache.
In VR, MSFS can fill up 24GB of VRAM over cities with photogrammetry. The faster you are travelling the more acute the VRAM data swapping stutter will be. You can help the VRAM use by modifying the se sliders:
- Texture resolution
- Render resolution
- Terrain Pre-caching
The Task Manager shows the GPU VRAM use as ‘Dedicated GPU Memory Usage’. You cannot assume that if its less than 100% filled it wouldn’t use more if it could. Some storage space may be used as a holding pen to manage the changing data and the list is made of irregularly sized chunks that won’t fit perfectly into what’s available.

‘Dedicated GPU Memory Usage’
I’ve come to the conclusion that MSFS is bigger than my GPU can handle, so when buying a new graphics card, the amount of VRAM it carries will be an important factor. Unfortunately, only the most expensive cards carry 24GB+ of VRAM.
Reduce Overheating on the Main Menu
The Power Saving option in MSFS replaces the animated background with a static image, but this isn’t as effective as switching that option off and going to the Content Manager menu in 2D mode as shown in the chart below.
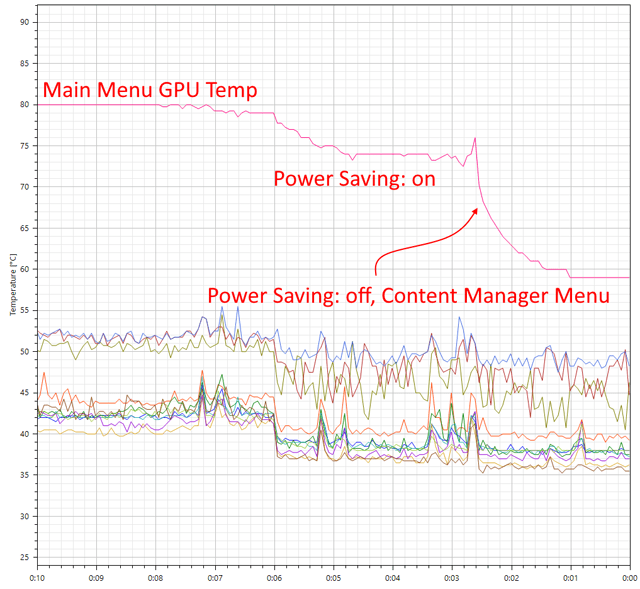
The top line is GPU temperature, the others are CPU core temperatures
The order of the operations makes a difference, so follow each step in the listed order.
- A VR flight is in progress, exit to main menu
- The GPU temperature rises to maximum
- Switch to 2D mode
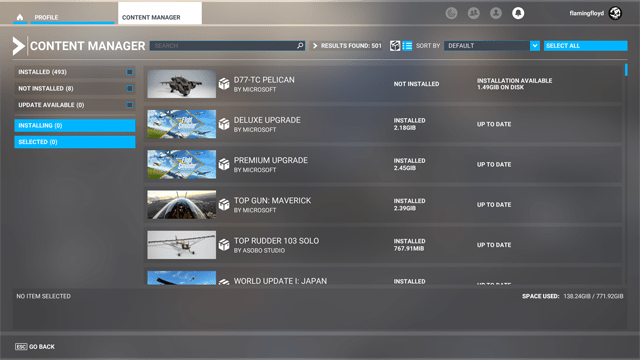
- Go to the Content Manager menu
- The GPU temperature should now be falling. If it doesn’t, return to the main menu then back to the content manager once more
- You may be able to reduce the temperature of the cores by closing your VR drivers
to prevent stressing the GPU when you take a break
Test the High Performance Event Timer (HPET)
As always: if in doubt, do nothing!
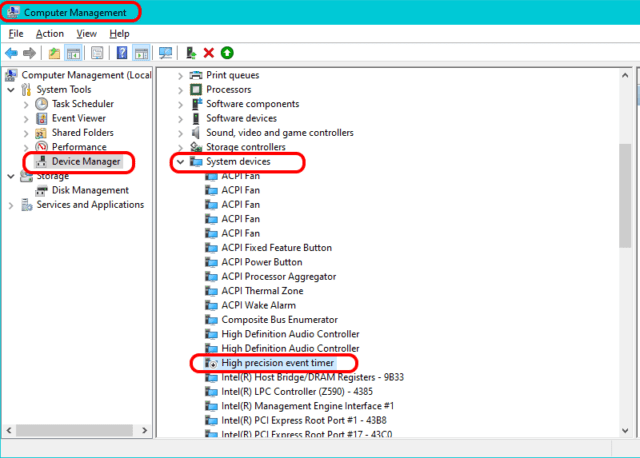
You can test if HPET leads to FPS loss with LatencyMon. This video by Troublechute explains all you need to know, including what HPET its used for and use of a test program.
With regards to LatencyMon, the report on the front page is misleading. It states a ‘conclusion’ when in fact it is always monitoring and the test is ongoing. Any detected latency a any time will change the statement to a negative one. I would predict that you will always get a negative conclusion if you left it running through a sim flight, with HPET on or off.
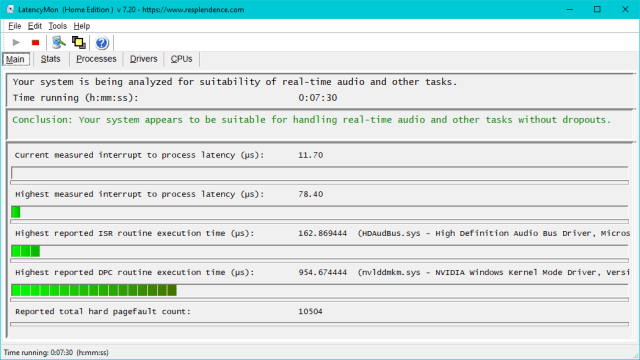
I think the best way to use the monitor is to check the use of HPET in a moderately loaded system to see if it has a preference for HPET to switched on on off. If it doesn’t have a preference, then leave the setting alone.
Most Effective PC Components
Focus on the components that make most difference.
pcpartpicker have made a study of how PC parts are utilised by the sim and suggest parts lists for low to high end computers. The sim is likely to remain controlled by a single thread for the foreseeable future, therefore CPU with 6 or more cores, a high single core clock speed and 25 MB or more of level 3 cache will provide the best results.
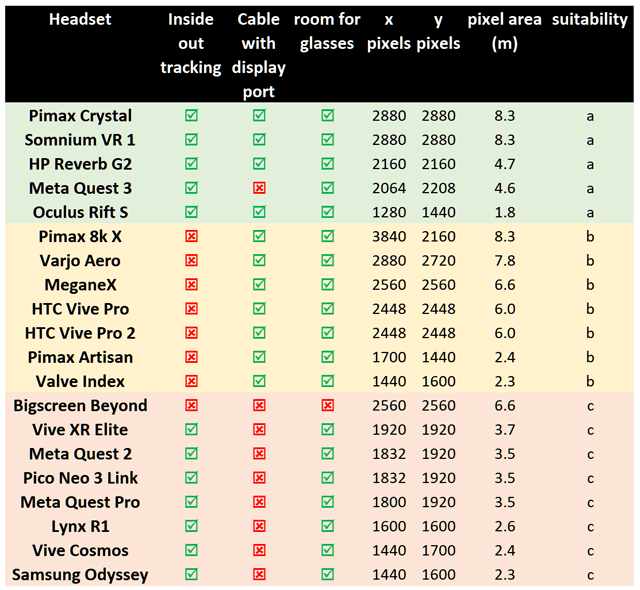
VR Headset Rough Comparison
What the flight sim needs is a headset with display panels above 2000 x 2000 pixels, a display port to avoid compression artefacts, and inside-out tracking to reduce desk clutter.
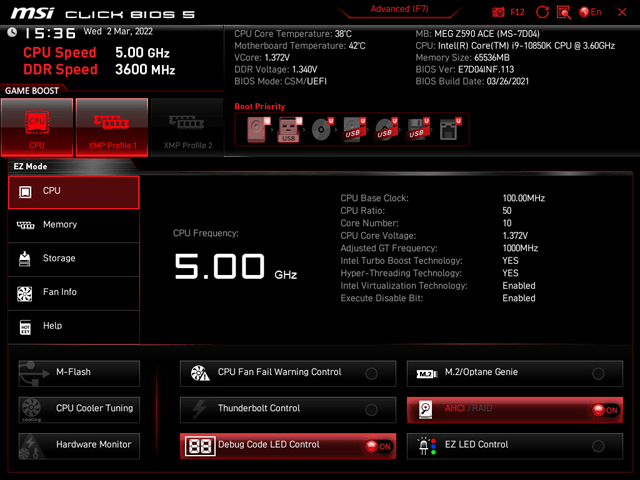
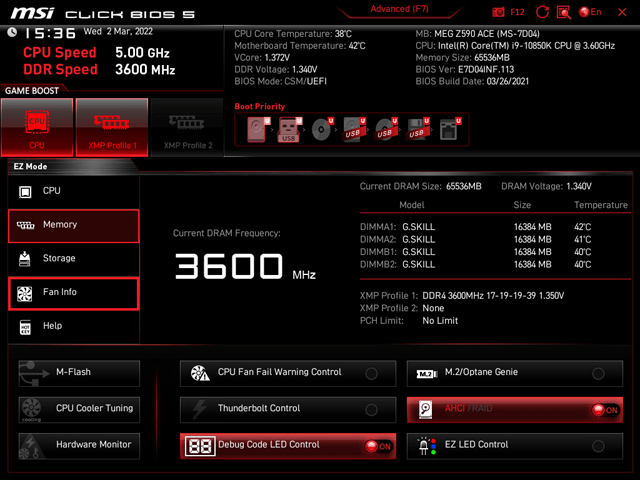
Check Your Bios Settings
It may be worth checking your BIOS to ensure its set or still set the way you want and/or expect it to be. If you are not sure what to do, find out before you go into the BIOS and don’t change things you don’t fully understand or you may regret it (specifically don’t change voltage levels).
In my case I have two preconfigured options for the CPU and memory, so I just ensure that these are enabled and then exit.
Note 1: without the memory speed ‘boost’ it would not be running at the advertised speed.
Note 2: The CPU speed boost sets the clock speed to maximum
Note 3: Consider the USB power mode setting – this controls the power state of the USB ports when the rest of the computer has been switched off.
Here is a useful video that might help.
How to Overclock an Nvidia Graphics Card
NOT FOR LAPTOPS!
(extra heat will be generated)
MSI Afterburner is a free utility for basic overclocking. The electrical limits on the UI are defined by the manufacturer and are adhered to by Afterburner.
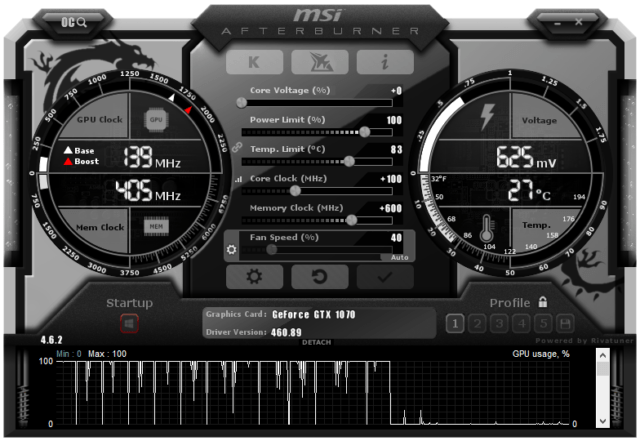
- The instructions for the MSI Afterburner are in a blog post on the MSI site and can be found here. The skin shown in the instructions is called MSI Cyborg Afterburner Skin White.
- MSI Afterburner can be used to:
- Create and maintain a fan speed profile
- Create a one-click GPU overclocking profile
- Overclock your graphics memory
- The Apply button is shown as a tick icon and you must press that button to confirm that you are saving or using a profile each time you make a change.
- The storage areas marked 1 to 5 are accompanied by a padlock icon. You must open the padlock in order to save a profile to one of the storage areas.
- In order for MSI Afterburner to be able to do its job it must be configured to start with Windows and left running. You can hide it away in the taskbar system tray area by selecting the appropriate options.
You can find an entertaining explanation of the process here.
You Might Also Like…
…these individual hardware related articles:
- The T16000M Joystick LED & Tension Mods – two well-known Thrustmaster mods
- How to Re-Grease a Thrustmaster TWCS Throttle – the new grease is like magic
- The Logitech G903 Wireless Mouse – how to fix some of the many problems
- G502 Mouse Rattle Fix – a brilliant mouse that rattles just has to be fixed
- T-Flight HOTAS X Maintenance – how to stop the joystick squeaking
- VR with the Oculus Rift S – a look back to the start of my VR journey
- Why Your Broadband Speed is Less Than Expected – it can’t be achieved and here’s why.