MSFS: In-Sim Settings
In this article we look at the graphics and data settings that are available within the Microsoft Flight Simulator itself.

Page Contents
- 1 Introduction
- 2 MSFS ‘PC’ Graphics Settings
- 3 A DLSS/TAA vs DX11/DX12 Comparison Video
- 4 MSFS ‘VR’ Graphics Settings
- 4.1 VR: Anti-Aliasing
- 4.2 VR: Render Scaling
- 4.3 VR: Terrain Level of Detail
- 4.4 VR: Off Screen Terrain Pre-Caching
- 4.5 VR: Terrain Vector Data
- 4.6 VR: Buildings
- 4.7 VR: Trees
- 4.8 VR: Grass and Bushes
- 4.9 VR: Objects Level of Detail
- 4.10 VR: Volumetric Clouds
- 4.11 VR: Texture Resolution
- 4.12 VR: Anisotropic Filtering (Maximum)
- 4.13 VR: Texture Super Sampling (8×8)
- 4.14 VR: Texture Synthesis (high)
- 4.15 VR: Water Waves (high)
- 4.16 VR: Shadow Maps (2048)
- 4.17 VR: Terrain Shadows (low)
- 4.18 VR: Contact Shadows
- 4.19 VR: Windshield Effects (high)
- 4.20 VR: Ambient Occlusion (medium)
- 4.21 VR: Cubemap Reflections (medium)
- 4.22 VR: Raymarched Reflections (medium)
- 4.23 VR: Light Shafts (medium)
- 4.24 VR: Bloom (on)
- 4.25 VR: Glass Cockpit Refresh Rate (medium)
- 5 MSFS ‘Traffic’ Settings
- 6 MSFS ‘Data’ Settings
- 7 Managing MSFS Updates
- 8 Feedback Tools
Introduction
Here are a few notes for the in-game settings at MSFS > Options > General > Graphics. Be aware that you might want to apply changes to both the VR and the PC settings.
Note: Remember to check your
settings after each MSFS software update.
The UserCfg.opt file stores your settings and can be found here:
Microsoft Store:
C:\Users\<login name>\AppData\Local\Packages\Microsoft.FlightSimulator_8wekyb3d8bbwe\LocalCache
Steam:C:\Users\<login name>\AppData\Roaming\Microsoft Flight Simulator\
The first line of UserCfg.opt has a version number in it (eg: ‘Version 66’) so you may get issues if you overwrite with a file of a different version number.
MSFS ‘PC’ Graphics Settings
These are the main things to consider within the PC settings page when using VR mode. Be aware that the sim starts up with the PC settings and the PC Texture Resolution setting. If you change these values they will not be implemented until you restart the sim. This means the texture resolution will not be changed to the VR setting when you switch to VR mode if those settings are different. Make sure your PC setting matches the VR setting you want for Texture Resolution (credit: 2020 fs’ers ).

PC: Display Mode (full screen)
Windowed Mode uses more CPU and results in a lower FPS. However, when you are trying out settings you will find it easier to switch away from MSFS when it is in Windowed mode. Unfortunately, that also makes it easier to accidentally launch external programs while you are clicking with the VR mouse pointer from inside MSFS. That’s one of the ways you can lose control of the mouse pointer in VR.
PC: VSYNC
VSYNC will ensure that only fully rendered frames are displayed displayed on your monitor so the refresh rate of the monitor will become the FPS limit.

A DLSS/TAA vs DX11/DX12 Comparison Video
Note that DX11 is still considered to be more efficient than DX12 for most purposes.
MSFS ‘VR’ Graphics Settings
VR: Anti-Aliasing
TAA mode gives the best visuals, otherwise try DLSS + Quality setting as the next best.
When using TAA, be aware that an upscaling and sharpening filter called Contrast Adaptive Sharpening (CAS) works well with TAA. CAS applies a sharpening effect to areas that are below a user defined threshold. In other words you can selectively enhance areas that have little contrast if you wish. You can apply CAS via the MSFS VR settings or by using the OpenXR Toolkit. A good way to achieve a realistic result is to increase the CAS percentage until you are aware of changes to the near, mid and distant views and then step it back a few percent until you the overall effect is at the limit of your perception.
VR: Render Scaling
Consider leaving the render scale at 100% if you are going to alter the scale elsewhere.
VR: Terrain Level of Detail
This determines the distance at which objects appear and what level of detail (LOD) is applied. The effect can be subtle so you can save FPS by going lower than 100% and still have a perfectly acceptable scene.
VR: Off Screen Terrain Pre-Caching
For VR this one needs to go as high as you can, Ultra is best, because you will be looking around a lot in VR and this setting will keep everything you may look at available for re-use.
VR: Terrain Vector Data
Vector data is responsible for terrain modelling and is most visible in the shape of rivers. Low values make rivers more jagged for example. Allegedly it makes no measurable impact on the CPU or GPU so in theory you could set this to High or Ultra.
VR: Buildings
This setting will determine the level of detail (LOD) that exists in the structures of the buildings themselves. If you are making videos of the buildings in an area you may want this setting high, but for normal use, there are useful FPS gains to be had by setting this to medium or low.
VR: Trees
This sets the draw distance for trees. Since I am interested in the environment I put this one to high.
VR: Grass and Bushes
As with the trees, it sets the draw distance for the level of detail (LOD). My preference is to go as high as I can.
VR: Objects Level of Detail
This slider defines the distance at which objects come into view, and for those items in view what level of detail (LOD) is used. Each object will have its own maximum view distance. I normally run this value at 85% since the missing details are not too significant.
VR: Volumetric Clouds
This is a CPU hog, but ‘High’ is a good compromise and captures the majority of effects available to the Ultra setting.
VR: Texture Resolution
Note: In the past the VR setting was found to be affected by the value of the PC setting although logically it should be treated as a unique setting in its own right. Since a restart is required to implement a change to Texture Resolution and MSFS boots up into the PC settings initially, the PC setting may still take precedence. Make sure your PC setting is set to your VR equivalent.
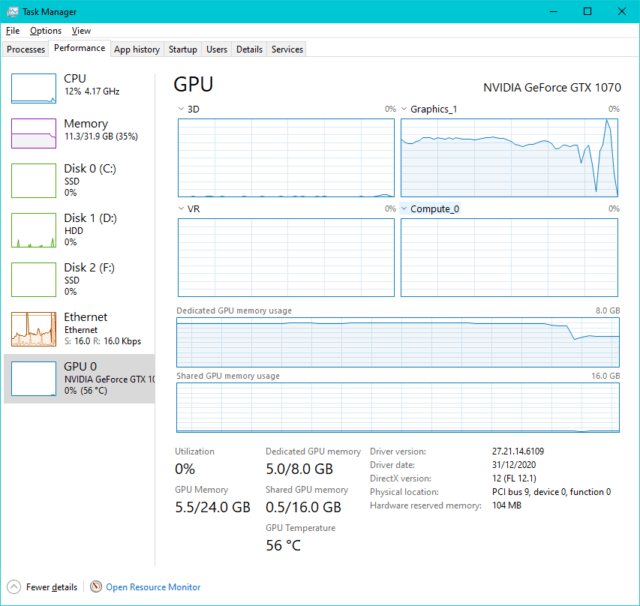
Texture Resolution makes a difference to the amount of detail you will see on the ground, so put this one as high as you can. The texture size also determines how much VRAM you are using. The place to find out whether the texture resolution might be causing problems is in the Dedicated GPU Memory Usage chart in the task manager. You will gain stability by ensuring there is spare capacity in your VRAM, for example 20% free. In this screenshot, the memory is nearly full even after switching the texture resolution from Ultra to High, but the VR flight was smoother as a result of making the change.
VR: Anisotropic Filtering (Maximum)
This setting reduces texture blur caused by perspective views and requires a fair amount of computational power to get a decent result. The higher the value, the shallower the viewing angle that can be achieved. Without anisotropic filtering you may, for example, may see box-like artefacts along the further edges of runways when taking off, etc. Another way to combat runway blur is to increase the texture super-sampling.
Nvidia has an option for Anisotropic Filtering in its control panel that takes minimal time to execute and so you can choose the highest value in the control panel and in the MSFS settings.
VR: Texture Super Sampling (8×8)
Super sampling means that textures are made larger than required and are scaled down when in use. On my 10Gb RTX3080 the high setting used 6 Gb of VRAM, whereas ultra used 7 Gb and the increased fidelity was worth having. Super sampling provides:
- Detailed images
- Anti-aliasing as a by-product
- Better looking runways at ground level
VR: Texture Synthesis (high)
This will improve low-resolution source data, for example, low-quality terrain image tiles. An additional noise texture is added to the image to give it the appearance of having extra detail. I think this is worth doing.
VR: Water Waves (high)
With each increase of this setting, a new set of smaller waves are combined with the existing ones for more realism. High seems to be plenty and you will get three levels of detail.
VR: Shadow Maps (2048)
This value affects the quality of the shadows in the cockpit. If you set this value to its maximum (2048) you will get a reasonable shadow with a soft sketchy edge, but you can get a more realistic one if you are willing to edit your UserCfg.opt file.
VR: Terrain Shadows (low)
This setting concerns shadows cast onto the terrain. Low settings are softer than higher ones. It can also use up FPS with no discernible improvement so I leave this setting at 1024.
VR: Contact Shadows
This creates shading that is specific to places where one object intersects with another, for example, trees and buildings with the ground. I’m not seeing any useful image improvement with this option and some shadowing is provided when this option is off anyway. Taking that into account I select Medium.
VR: Windshield Effects (high)
High provides excellent realism for rain and ice effects.
VR: Ambient Occlusion (medium)
This setting calculates the amount of ambient light that is available to illuminating parts of the scene in relation to the objects within it. It should cause the lighting to vary realistically, but I haven’t been able to see a difference as yet. Low is better than none.
VR: Cubemap Reflections (medium)
A cube map is a large external box surrounding the player’s viewpoint which represents the environment. The reflections from the environment will show up on the cockpit windows, and lower values will give a blocky outline.
VR: Raymarched Reflections (medium)
Ray marching is a reference to an implementation of ray tracing. If this setting is set to off you will still see reflections implemented via a different mechanism.
VR: Light Shafts (medium)
This is a nice-to-have, but you will get them to some extent anyway, so I set this low.
VR: Bloom (on)
Bloom is a realistic visual effect that mimics the way the eye adjusts to the brightest part of a scene. For example, a darkened room can be visible as long a the bright sunshine outside can’t be seen. Similarly, sunlight flashing in a mirror is accentuated by darkening the rest of the scene. Personally I like the realism of this effect so I have this switched on.
VR: Glass Cockpit Refresh Rate (medium)
The way the glass instruments update themselves has been greatly improved since early 2024 so the load is now spread out in time. It has also been allocated its own thread and won’t affect the main thread as much as it used to.
MSFS ‘Traffic’ Settings
This information was highlighted by SimHanger Flight Simulation who notes that the difference between setting these options to maximum or minimum on his system accounted for 50% of the FPS. Use fairly conservative settings in order to conserve FPS.
AI Traffic Density
This option has slightly different names under the ‘PC’ or ‘VR’ settings collections. In all cases these are setting the number of moving aircraft within the sim. At the time of writing, the free external app FSLTL provides moving aircraft with appropriate liveries more efficiently than the sim does since it provides FPS friendly aircraft for MSFS to work with.
Airport Life
The number of moving workers and vehicles will affect your FPS, so you should minimise these values. If you are using the free external app FSLTL, you should set the Ground Aircraft Density to zero since you do not want MSFS to add its own aircraft to those provided by FSLTL
MSFS ‘Data’ Settings
Photogrammetry
You can save FPS by leaving photogrammetry set to off.
Multiplayer
If you don’t really need this option, you can save a bit more on the workload by leaving this value off.
Bing Data World Graphics (on)
This value is normally set to on.
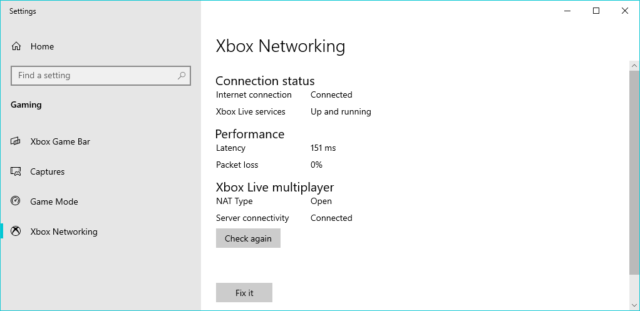
Note: If you have low res / blurred textures it might be to do with your network or options. Be aware that if your internet connection drops out, MSFS may turn off Bing map enhancement and leave it off from then on. You will have to turn it back on manually. Remember to re-enable photogrammetry data as well.

If this condition persists, you might find that your connection to the data is blocked. You should check this by typing Xbox Networking into the taskbar search box. It will tell you if your connection to the server is blocked. If you are having trouble, follow this YouTube video by Crispeay who links to a number of other contributors.
Rolling Cache
Note: See elsewhere for how to implement a Ram Drive to hold the rolling cache. It will be a lot quicker and save wear and tear of NVM drives.
There are two items for the ‘Options > General > Data > Rolling Cache’ to note:
- Limited cache size:
In early 2024 the memory management code was significantly improved. It should now be possible to have a 20Gb cache in theory but I’ve noticed a general preference for lower numbers. Jorg Neuman, head of MSFS, once mentioned his cache was 10Gb and I assume that’s because he has been advised by Asobo, but I don’t know. - Zero cache size:
OverKillSimulations has found that turning off completely can reduce stutter. It will depend on the speed of your connection to some degree and its something you won’t want to do long-term. It’s possible that the extra load due to filing the incoming terrain data could be transferred to a spare CPU core in when DX12 changes have been implemented. I saw some benefit from this when flying over the newly updated version of London which is now immensely detailed. Although it didn’t solve all my graphical issues it certainly made the flight noticeably smoother.
Manual Cache
I once stored half of London at high resolution and it took 40+ minutes to do and required 30Gb of data. I don’t think this is what they had in mind. It didn’t last long – I had to delete the cache on the next update. I no longer use this facility.
Managing MSFS Updates
On a Regular Schedule
From time to time, whatever else you may be doing…
- Check and update your graphics drivers as necessary
- Remove unused entries from your community folder
- You might want to take a copy of your config file
- Run Windows update to ensure it doesn’t do anything while you are in flight
- Run a virus check to clear any pending checks
When an MSFS Update is Released
- Check and update your graphics drivers
- Clear or rename your community folder then run at least one flight to consolidate the update. Exit MSFS via its menu options then restore the community folder.
- Clear your manual and rolling cache to prevent conflicts.
- Update anything that is out of date in the MSFS Marketplace to prevent conflicts.
Feedback Tools
CPU Hog
Note: see also CPU Hog – a tool made to track processes that might be running in the background whilst you are in the sim which has its own dedicated page.
Use the Built In FPS Analyser
You can access the FPS display from the Dev Mode menu bar after making it visible using General Options > Developers > Developer Mode = ON
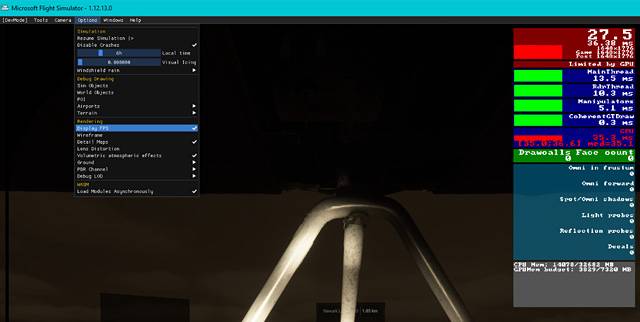
With proper tweaking of all the available settings, you will get to the position whereby the FPS is limited by the main thread rather than the GPU. It will then be a question of hardware upgrades and waiting for Asobo to apply optimisations and unpack the main thread onto multiple cores.
CapFrameX
The tool may have been devised to monitor the effect of limiting the frame rate to a practical value like 32 FPS. The tool will capture the output of MSFS or any other target in order to analyse its FPS. To use it, capture a sample and then check it over in the analysis tab.
Essentially it will show you what percentage of the total a particular FPS range represents. You can compare your recordings graphically to get feedback on changes you make to your settings which can be useful to spot the less obvious changes. I used it to raise the lowest FPS values and to minimise their frequency. I had already managed to do this without using this tool, but sometimes using a numerical readout is easier.
Windows Task Manager
I find it useful to see how much of the CPU, GPU and GPU RAM are being utilised by MSFS over time. The GPU load used to be over 90% but improved significantly after I had expanded my Page File. The maximum GPU readout may be under the ‘3D’ or ‘Graphics_1’ heading and hasn’t been consistent.
It is also useful to see how many cores are active, and how much of the CPU is being used by other processes. There are 16 cores in my system which is why the overall value appears to be low.
Benchmarking Software
- 3DMark Demo on Steam (look for the ‘download demo’ button)
- Cinebench from Microsoft Store
- Unigine Superposition
- User Benchmark
- SiSoft Sandra