
MSFS: Best Quest 3 PCVR Configuration
The Quest 3 headset can be used with Microsoft Flight Simulator with excellent clarity and smoothness. You just need the right configuration.

Page Contents
The Quest 3 PCVR Connection
The Available Quest 3 PCVR Connections
There are 4 ways to connect the Quest 3 to your PC.
- Oculus air link
- Oculus wired link
- Virtual Desktop with Steam VR
- Virtual Desktop with OpenXR (recommended)
To give the Quest 3 wired link the best chance I used a 10 Gbps rated USB-C to USB-C cable with the Oculus debug tool set to 940 bps and 1.2 x super sampled image. Virtual Desktop at 200 Mbps is far better.
The Best Quest 3 PCVR Connection
After testing each of the Quest 3’s wired and wireless PCVR configurations the hands-down winner is the Virtual Desktop’s AV1 10-bit codec. Note: I have an RTX4090 which is known to make a difference to the speed of compression.
To help Virtual Desktop, I have set up a local WiFi access point from my PC so the headset gets a strong 5GHz signal.
Another advantage of the Virtual Desktop is that on the Quest 3 side of the link the app provides options to improve and adjust the image quality.
The Suggested Quest 3 Configuration
Here is a diagram of the Quest 3 configuration on a standard 5 GHz WIFI link.
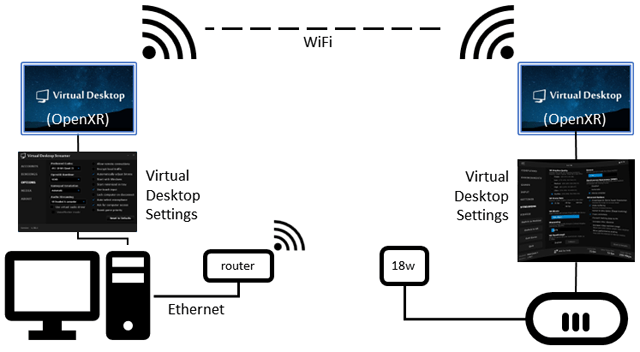
(Note: the PC must be connected to your router using an ethernet cable)
There is no need to super sample the image size or use any kind of processing. As long as you have selected the AV1 10 bit codec and the VDXR runtime you can hand the image processing over to the Virtual Desktop app in the Quest 3 which seems to have spare capacity for that job.

The Quest 3 Virtual Desktop interface gives you a lot of control over how the signal from the PC is handled. As you can see from the above screenshot, I’m using Godlike resolution, 72 fps target, the full 200 Mbps and some sharpening. The Snapdragon super resolution is probably helping a lot here to make the image look really good.
Notes
- It is possible to record a good quality video within the headset without adding to the load on the PC. You will have to make sure the headset sound is active – its easy to turn the volume down accidentally.
- A cable connected to the PC provides power to extend the life of the battery by several hours, but if you plug your cable into the charging plug provided with the Quest 3 you might even gain battery percentage as you sim.
You might consider boosting the speed of the WiFi link by moving to 6e, but you will probably need to buy an external modem as well as the router itself. WiFi 6e benefits:
- A higher frequency providing lower latency
- Faster throughput / faster error correction
- More efficient organisation of data streams within the bandwidth
- All of the above resulting in higher bit rates for PCVR
Quest 3 Video Examples
The following clips have been recorded inside the Quest 3. I am having problems recording sound, but when it is available it introduces a stutter just before the ATC or my co-pilot speaks.
Example 1
The resolution of the this video is just under half the resolution of its LCD panels at 1000 pixels. Note: YouTube re-encoded the 1000 pixels down to 720 pixels.
Example 2
I chose a 1920 x 1080 recording for this one although YouTube might have re-encoded the video to its own format at the same resolution.
What is VirtualDesktop?
VirtualDesktop is a paid application that comes in two parts, one for each end of a WIFI connection between your Quest 3 and the PC. It replaces the need to use Oculus Link via WiFi or cable.
The PC based component is a free download from the Virtual Desktop web site. The other end of the link is handled by a Virtual Desktop app provided in the Meta Store. I bought the headset version of Virtual Desktop directly from the Oculus Quest 3 Store inside the headset to make sure I had the correct version. Luckily there was a sale on at the time so the cost was around £11 instead of £15.
How to Install VirtualDesktop
Step 1 – Preparation
Before you begin upgrading to the beta version of VirtualDesktop you must prepare your PC
- If you have the private release of the module developed by Matthieu, use a tool such as Revo Uninstaller to delete it and all of its associated files and settings.
- Ensure that the existing SteamVR configuration has been altered to prevent conflicts.
- Open Steam
- Open SteamVR
- Open SteamVR dialogue menu
- Choose Settings
- Choose the OpenXR option
- Choose Manage OpenXR API layers
- Turn off the compatibility layer for the OpenXR plugin
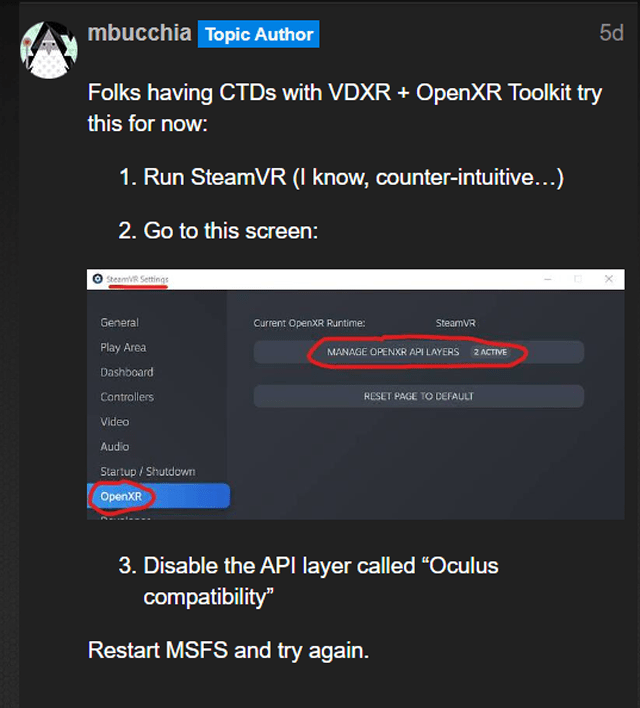
(you can find this information on Discord)
Step 2 – Upgrade Virtual Desktop for the Quest 3
To upgrade your Quest 3 version of Virtual Desktop you need to open your mobile app and be signed in.
- Find the Virtual Desktop app
- Scroll down until you find the version number.
- Tap on the version number to open a new window
- Tap on the drop-down list at the top-right and select the higher version number marked as BETA.
- When you next turn on your headset it will sync with the store and upgrade your version of Virtual Desktop.
Step 3 – Upgrade Virtual Desktop for Your PC
Download the Version 1.29.3 of the PC end of the VirtualDesktop update from the VirtualDesktop website to obtain the latest version.
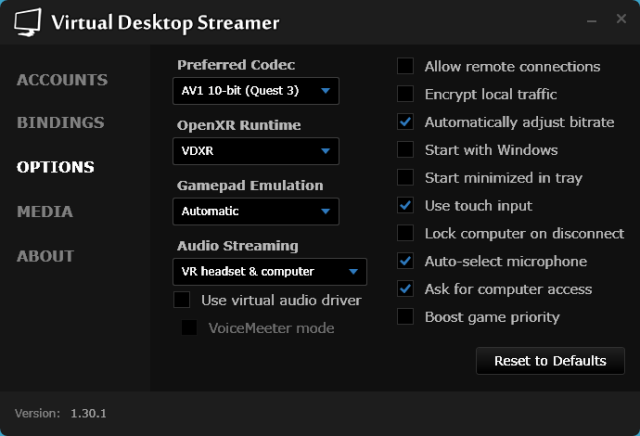
From the Options menu
- Change the ‘OpenXR Runtime’ to OpenXR, or Automatic.
- Set the ‘Preferred Codec’ to ‘AV1 10-bit (Quest 3)’ for maximum quality compression. Unfortunately this adds around 20 ms latency for encoding and decompression and is the part that a requires a powerful GPU such as an RTX 4090. AV1 packs 30% more data into the available bandwidth than the nearest best alternative.
Step 4 – Set the Highest Bit Rate
In the headset, set the Virtual Desktop ‘Streaming’ configuration the the maximum available, currently 200 Mbps for WiFi. If the reading is lower, it may correct itself if you quit and restart VirtualDesktop one or more times.
System Settings
Optimise Your WIFI Network
I now have a PCIE WIFI antennae sat on top of the PC 3 feet from where I sit so the signal strength is at maximum. It’s WIFI output has the same SID and password as for the rest of the house. The signal capacity is around 866 Mbps and Virtual Desktop currently only needs a bandwidth of 200 Mbps. Its worth considering WiFi standard 6e for lower latency, higher throughput and higher stability.
Try Hardware Accelerated GPU Scheduling
Up until now I would have had this setting switched off, however it makes a noticeable and positive improvement for the Quest 3 / Virtual Desktop combination to have this setting enabled.
Search for Graphics Settings from the task bar
Notes
What This Connection Cannot Do
This connection will not fix stutters that have been around since day 1, for example:
- Fast data exchanges, such as:
- A rotating field of view
- Passing objects at close range
- Loading new scenery
- A saturated CPU or GPU
What This Connection Can Do
I am surprised that this relatively low bandwidth solution easily beats the higher bandwidth ones, and that the sim can be run over a WIFI connection at all. The cable does not appear to be necessary other than to extend the life of the battery during use, or to download recordings from the headset.
The result is a very stable, detailed image at high resolution. It is possible to see the pixels, mura and screen-door effects but its not a major issue. The imperfections in the sim are now equivalent to the imperfections in the display. For this reason, I think the Quest 3 matches MSFS 2020’s level of development nicely.
The AV1 transmission link
- The compression algorithm is block based sub-division. Only detailed areas of a frame receive the highest attention using the most sub-divided blocks. Less complex areas are allocated larger blocks.
- The compressed blocks are given motion and scaling information to predict the next frames
- Most likely only the compressed information is transmitted, containing the least amount of pixel information.
- Its likely that only the differences in the frames is transmitted
- The transmission method uses reference frames to refresh the quality of the stream, but that doesn’t necessarily mean a whole frame is needed at once.
Miscellaneous
- The Oculus Link options are separate from the Virtual Desktop options, so don’t mix the two together. Use only one or the other.
- In order to download a video recorded by Virtual Desktop, you will need an cable and an Oculus Link configuration. Clear away the Virtual Desktop configuration first. Plug in the cable to your headset and look for a message that asks for permission to use the cable to transfer data (I don’t recall the wording). When, eventually, you get that part right, an Oculus Quest 3 icon will appear in File Explorer and the video will be stored under the Oculus folder, not the video folder.
Matthieu Bucchianeri
Take a moment to acknowledge how Matthieu Bucchianeri transformed the way VR could be accessed from a PC. He is a Microsoft engineer who has been working on OpenXR components in his spare time. Matthieu provided the entire OpenXR Toolkit for free along with a suite of ancillary tools.
Matthieu has also prototyped and then assisted with the integration of the OpenXR capability into a beta release of the VirtualDesktop (version 1.29.3) which has until now relied upon SteamVR to provide its VR functionality. From now on, the updates to either end of VirtualDesktop will arrive through the normal updating method.