An MSFS FlyingIron Spitfire Quick-Start Guide
If you are struggling to keep your new MSFS FlyingIron Spitfire in the air when you get airborne, this is what you need to do.
Page Contents
Looking for the X-Plane Version?
You can find the X-Plane Spitfire Quick Start Guide Here
Preamble
How to Get Started
Unlike the X-Plane version you will not need to set special key-binds before you take off. The MSFS version of the Spitfire has better documentation than its X Plane predecessor – you can get off the ground by:
- using the MSFS checklist panel in the toolbar to find the controls in the correct order
- refer to the straightforward Quick-Start Guide in the PDF manual located in the Spitfire’s documents folder
- start with the engines already running on the ground or start in the air if you get really fed up.
I find it easier to memorise these 5 stages rather than a single list of steps:
- Secure the aircraft
- Ensure parking brake is engaged
- Ensure the door is closed and locked
- Initialise the electrical system
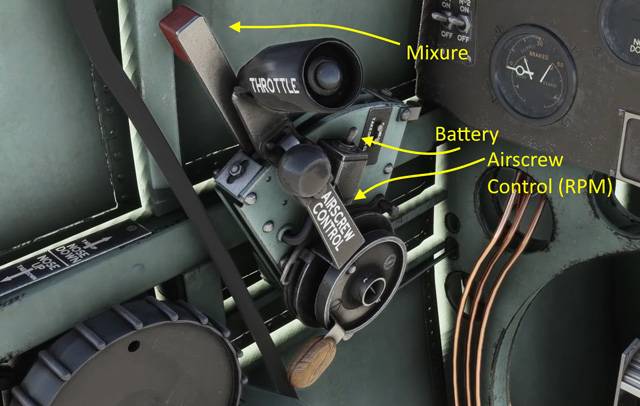
- Turn on the battery under the throttle lever, or move the throttle forward momentarily to switch it on.
- Turn on the two magnetos on the left hand side
- Initialise the fuel system
- Set propeller control fully forward
- Set mixture control fully forward
- Turn the fuel selector at your right knee to ON
- Prime the fuel system
- It’s not necessary to use the wobble pump any more.
- Unlock the primer at your right knee by rotating anti-clockwise, prime the engine by pulling the primer 5 times, lock the primer clockwise
- Set throttle to 10%
- Start and prep for taxi
- Flip open the start and boost guards, engage starter, replace guards
- Select and activate a radio button
- Contact the tower
New Features & Virtual Tablet
New functionality has been wrapped up into a virtual tablet stowed on the bottom left hand-side of the seat. Click on it to open, and from here you can enable and disable selected features amongst other things.
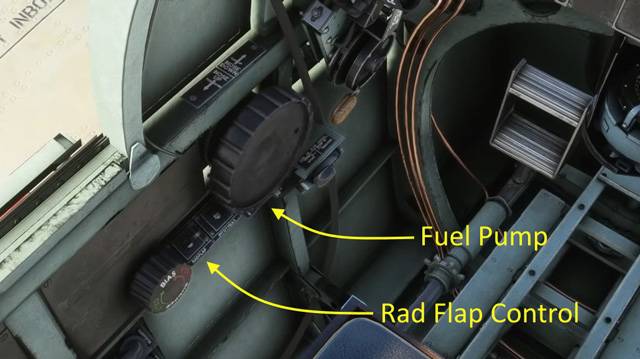
The Obscured Battery Switch and Pressure Warning Light
As described in the cold-start sequence be aware that the battery switch is hidden from view under the mid-point of the throttle lever. You can turn it on using the throttle lever itself, or by clicking with a mouse. Similarly, the warning light for the wobble pump oil pressure is obscured by the wobble pump handle.
Throttle & Boost
The ‘boost’ readout is controlled by the throttle and is proportional the the fuel flow rate. If you reduce the throttle enough, the RPM will eventually drop below the set value and will be controlled directly by the throttle instead.
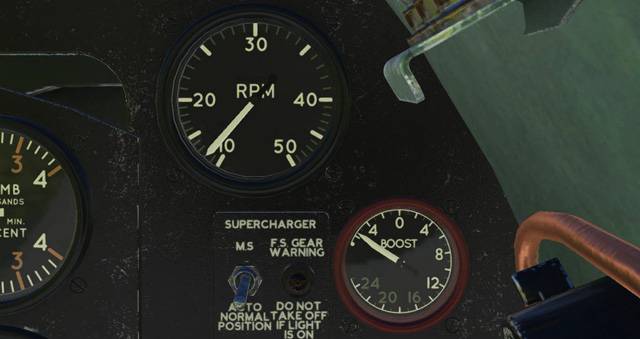
Propeller Pitch, RPM & Cruise Speed
The Spitfire has a constant speed propeller with the RPM defined by the Pitch lever to the immediate right of the throttle. Normally you will keep the RPM at a chosen value and adjust the boost with the throttle – for example the cruise setting is an RPM of 26.5 at +7 boost. The Spitfire can climb easily at cruise speed without overheating, so you could fly without changing the settings. To reduce heat build up further, open the radiator flap via the switch to your left.
Reading the State of the Flaps
During take-off ensure the flaps are up, and down during landing. There are only two options: up or down.
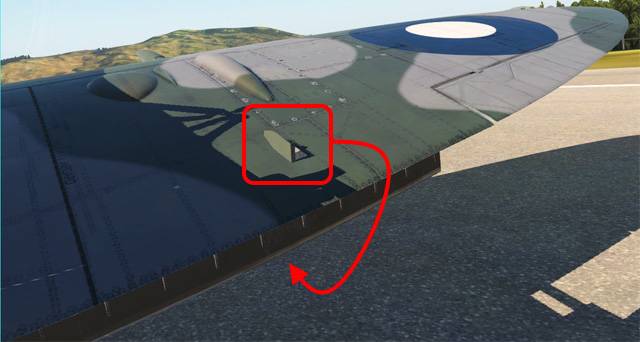
You can see the state of the flaps by looking for a small tab of metal standing vertically on the wing by the cockpit, or by going to an external view.
The Rudder Bias Trim Wheel
The rudder trim wheel is the smaller wheel on the left of the cockpit. The rudder is used to counter the left-hand roll due to engine torque if you need it.
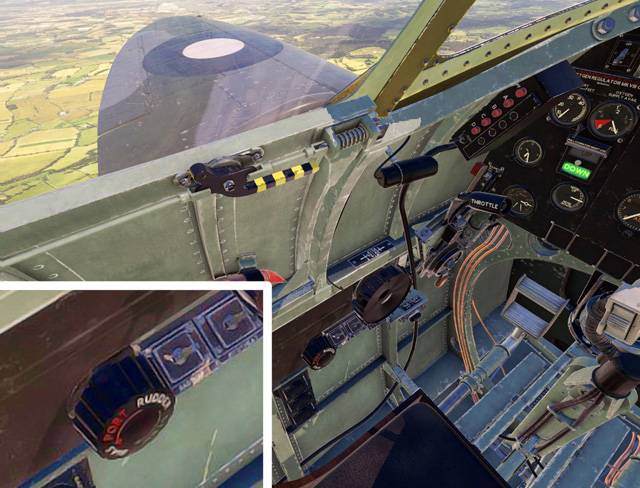
Rotate the wheel anti-clockwise so the space between the words ‘Port’ and ‘Rudder’ is at the top of the wheel. This will get you near to balancing the aircraft and then adjust from there according to current speed etc.
How to Taxi
In the taxi phase, the rudder will not be getting enough energy from the prop wash to turn the Spitfire. To do that you will need to use wheel-braking independently for each wheel. If you don’t have rudder pedals the wheel selection can be made by moving the rudder in the required direction and dabbing the wheel brake control.
altitude, speed, rate of climb, RPM and boost.
The key thing here is to set the RPM low and leave it alone. Assuming the engines are already running then:
- Release the brakes by pressing your ‘parking brake’ key-bind. You will hear a hissing noise and the spitfire will roll forward.
- Taxi at 1200 RPM on a hard surface, 1500 RPM on grass
- Always hold the stick back slightly to keep control!
- Use the rudder direction combined with dabs on the wheel brakes to guide the aircraft
- Avoid sudden direction changes.
- Avoid sudden RPM changes.
How to Take-Off
The most important thing I learned in making this video was that you must pull back on the stick when landing or taking off and keep it held back to avoid swinging around wildly. You will learn that you can go fairly gentle with it, but it must be there. I suspect that anything non-zero would be enough to make the difference.
- Ensure the take-off will be into the wind
- Ensure you parking brake is on.
- Manually set the altimeter to zero.
- Ensure the flaps are up.
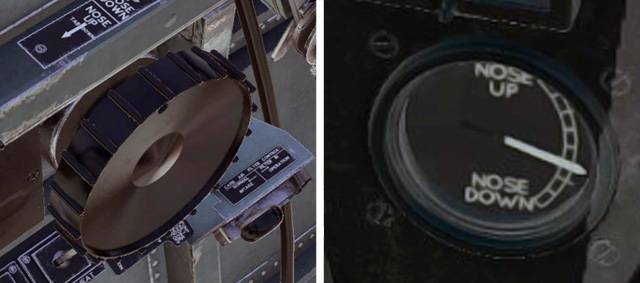
- In theory you should set the pitch trim wheel 1 notch lower than neutral, but it doesn’t make a massive amount of difference if you leave it alone.
- Trim the rudder to the right about 1° so you are set for cruise at the top of the climb, and it helps with the left hand pull as you throttle up. This is a refinement that you could leave out.
- Pull back the stick slightly to keep control all through the take-off!
This is the thing that does make a massive difference, so don’t forget it! - Increase throttle/boost gently, you don’t need to apply full thrust!
- Slowly increase the RPM to to give the rudder something to grab onto.
- Release the wheel brakes and gently increase the boost gently and steadily
- Keep holding the stick back slightly to keep the tail-wheel on the ground until you leave the runway!
- Use the rudder to make adjustments as required.
- Lift is achieved at around 2300 RPM / 90 mph so when yo get there push steadily to the 30000 RPM, that movement should take about 1.5 seconds. If you do it quickly the aircraft will lurch to the left, so spreading the time out allows you to keep control.
- Keep the stick back just a few degrees to lift off gently, jeep the stick away from rest position.
- Gently increase the throttle/boost to +7 (cruise speed), 180 mph is the optimum climb speed.
- Retract the landing gear at 140 mph.
How to Stay in the Air!
If you take off with engine damage enabled and you don’t change your controls within 5-10 minutes you will lose power and drift to the ground. The reason for this is due to engine damage caused when either the oil temperature rises to 100℃ or the coolant has reached 125℃ (the gauge marked RAD TEMP).
When you get in the air, you will need to set the aircraft for cruise mode to prevent engine failure:
- Set the Mixture control to about 70%, you can find it next to the throttle/boost lever.
- Adjust the throttle/boost lever so that the boost readout is at +7.
- Set the Airscrew control (propeller pitch adjustment control) to around 70% and adjust it until the RPM meter = 2650. The airscrew control is next to the Throttle/Boost lever.
- Open the radiator flaps, the switch is on your left of the seat base, push it aft, toward the tail.
- Above 12000 feet, be sure to set the pressurisation cock ON.
- !! New Feature !!
Be aware that the oil and radiator temperatures will start to rise when you drop the landing gear or the flaps, so you have a limited amount of time to get on the ground.
How to Land
This is the type of landing pattern an actual Spitfire pilot would have made. I have adjusted the instructions to monitor the ‘boost’ meter which is less ambiguous then RPM for a constant speed propeller.
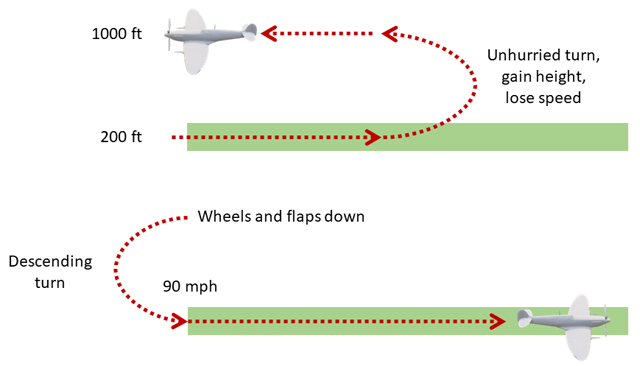
- Ensure the initial approach will be into the wind.
- Overfly the runway you intend to land on with a high airspeed of and a height of about 200 feet.
- At mid-runway, pitch up and turn to the left to face the initial approach direction. You will be duplicating this curve on your final approach so make an easy curve.
- Fly parallel to the runway at about 1000 feet.
- Slow the airspeed to below 160 mph.
- When your wing-tip points to the end of the runway, drop the landing gear and flaps.
- Drop the throttle so the boost readout is -4. This will give you a slow descent.
- Begin a descending left-hand turn, adjusting the rate of descent will bring you to the start of the runway.
- Aim to reach the runway at about 90 mph.
- Begin your landing flair at about 65 mph. Keep the flair low to the ground and use a moderate flare angle in order to stay low.
- Always hold the stick back slightly to keep control after touch down! Do not let the stick go back to its rest position!
- When on the ground, reduce the throttle to minimum.
- Use the rudder to stay centred, but using as little as possible.
- When the rudder becomes less effective start using the brakes.
- Braking can be applied successfully if you have rudder pedal toe brakes and are gentle with it. Before I had rudder pedals, the single button-press I had bound braking was difficult to execute properly.
- When you stop, apply the parking brake.
- Raise the flaps.

Start & Take-Off Tutorial
Once you have had your initial fun with the Spitfire you will want to start learning the proper process and make some adjustments. Here are a few things to get you started.
Other
This is Not a Bug
The following description was true of the X Plane version the last time I used it, and should also be applicable to the MSFS version for the same reason.
The artificial horizon is the dial below the gun sight at the centre of the screen. As you can see, the horizon line is tilted at 45 degrees while the aircraft is level. I put the instrument into this state by performing a barrel roll.
This result models the nature of the real-world counterpart that can be thrown into an inaccurate state by acrobatic manoeuvres. You can refer to manual to learn how to stop that happening, or else you could try a vertical loop to reset it.
The Sound of a Spitfire
What a great sound!
The Battle of Britain
Never in the field of human conflict was so much owed by so many to so few
Winston Churchill
The RAF Museum says it took the equivalent of 200 to 320 flying hours to train a pilot over a period of 18 months to two years. The average age of a pilot was 20 and the age range was 18 to 30. Of the total number of pilots that took part in the Battle of Britain from 10 July to 31 October 1940 about one fifth of Fighter Command’s aircrew came from overseas. The number of listed pilots implies that there were close to 3000 pilots in total.
Overseas pilots taking part in the Battle of Britain:
- 145 Poles
- 126 New Zealanders
- 98 Canadians
- 88 Czechoslovaks
- 33 Australians
- 29 Belgians
- 25 South Africans
- 13 Frenchmen
- 11 United States of America
- 10 Irish
- 3 Rhodesians
- 1 Jamaican
- 1 Barbadian
- 1 Newfoundlander
- 1 Austrian