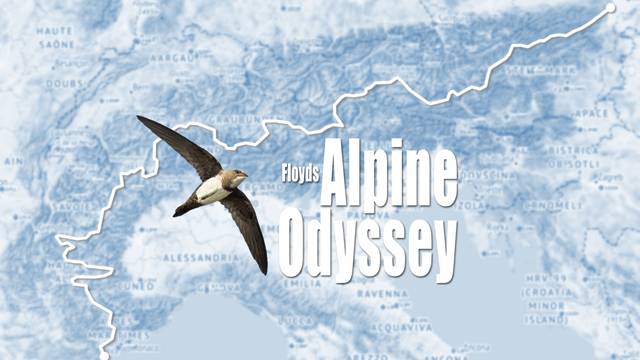
Floyds Alpine Odyssey
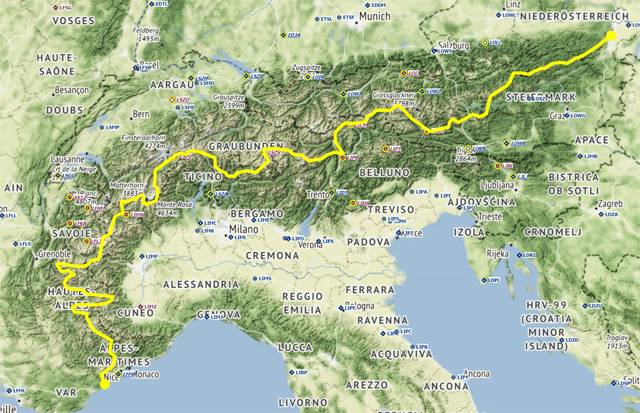
Floyds Alpine Odyssey is a 1000 mile glider route through the Alps starting at the Southern coast of France and ending in Eastern Austria. The route is broken into 10 stages so you can tackle it one day at a time.

Page Contents
Quick Start Guide
- Download the Alpine Odyssey zip file and unpack it
- Move the Alpine Odyssey weather presets into your community folder
- Download and install the AS-33Me (listed on this page) as required
- Download and install the additional airports (listed on this page) as required
- Update the ‘MSFS Addons Linker’ if you are using that tool
- Check this page for information about the AS-33Me controls as necessary
- Start MSFS
- Load a practice flight plan
- Select the Alpine Odyssey 18kt adventure weather
- Select the AS-33Me glider
- Start your flight
Alpine Odyssey
The Route
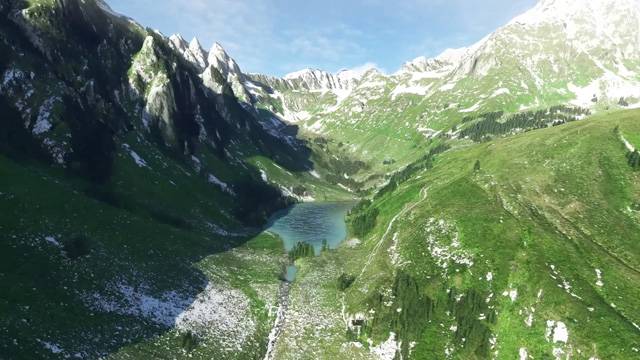
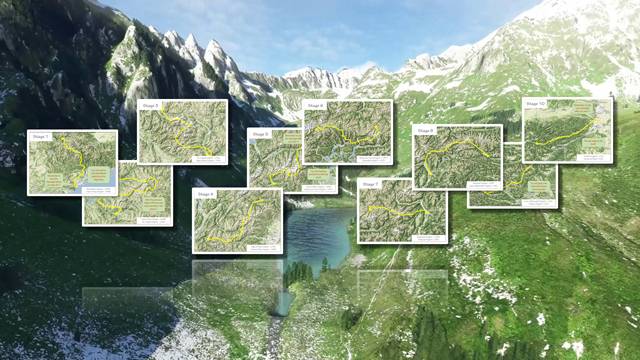
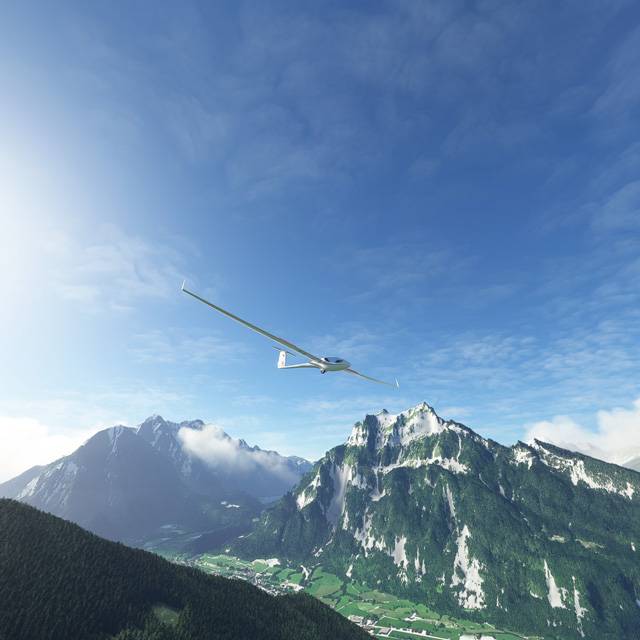
The Alpine Odyssey is a ridge-lift route for the AS-33ME glider. It starts at the South coast of France and ends in Eastern Austria, a total of nearly 1000 miles. The route is divided into 10 stages you can tackle one day at a time.
Weather Presets
The routes require the use of the Alpine Odyssey ‘realism’ or ‘adventure’ weather preset options.
- ‘Realism’ mode contains cirrus clouds and summer temperatures for the best possible gliding conditions.
- ‘Adventure’ mode includes unsafe conditions such as clouds, rain, ice and snow that you wouldn’t normally be allowed to fly in.
Select the 18kt version first, but if you find that too easy you can select the 14kt version for more of a challenge.
The Glider
In order to get the best out of this route you should use the AS-33ME glider – free from flightsim.to. You will need to follow the route closely and clear each waypoint in turn. Practice routes are included in case this is your first time in an AS-33ME glider. The instruments you will use most are described in detail in another section.
Download

Preparation
In order to begin the Alpine Odyssey you will need to load
- the Alpine Odyssey weather preset (supplied)
- A flight plan (supplied)
- A glider – preferably the AS-33ME from flightsim.to
Where is my Community Folder?
If you need to find your community folder follow this link for a complete explanation.
How to Install the Weather Presets and Flight Plan:
- Unzip the downloaded file to its own folder and look inside
- Look inside the Weather Preset folder
- Copy the weather preset folder to your community folder
- Restart the sim in order to load the weather
- Open the World Map
- Open Flight Conditions
- Choose Alpine Odyssey 18 kt ‘realism’ or ‘adventure’ preset
- Go back to the World Map
- Click on More (at the bottom of the screen)
- Click on Load/Save
- Click on Load
- Choose the required flight plan from your downloaded files
- Select the AS-33ME aircraft
- Start the flight
How to Uninstall the weather preset:
- Move the Alpine Odyssey folder out your community folder
- Restart the sim
- The presets will no longer be in the Weather Presets list.
Free Assets from Flightsim.to
The following assets would improve the realism of the Alpine Odyssey
Gliders
Scenery
Airports
- LFMR – Aérodrome de Barcelonnette – Saint-Pons
- LFNC – Mont Daupin – Saint-Crépin
- LFHU – L’Alpe d’Huez
- LIMW – Aosta
- LSPU – Munster
- LSZS – Saint Moritz – Samedan
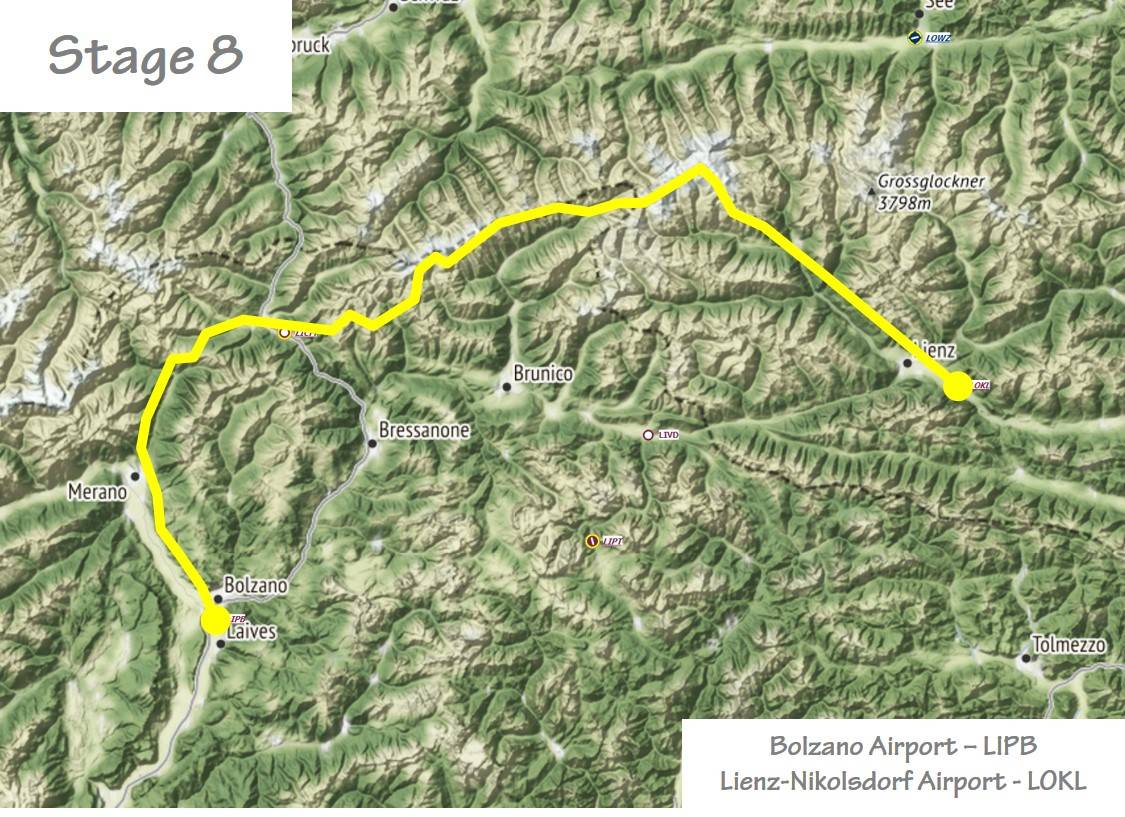
- LIPB – Bolzano
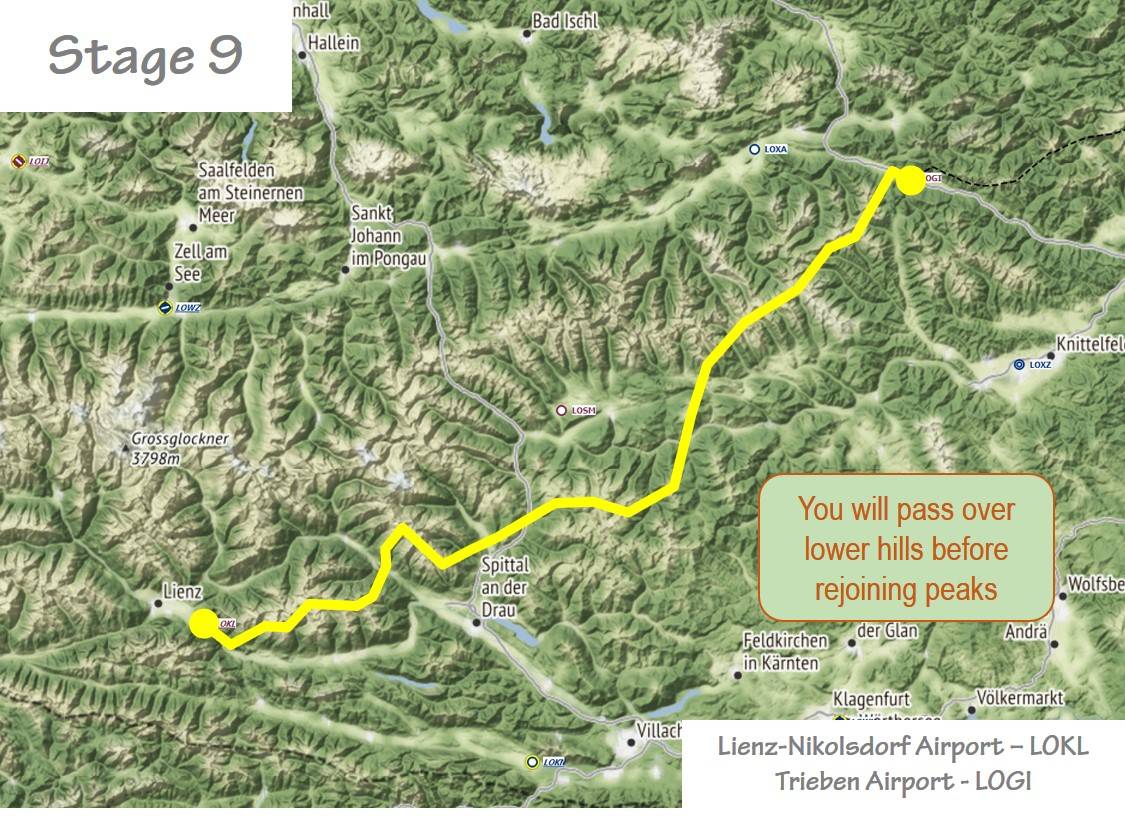
- LOKL – Lienz-Nikolsdorf
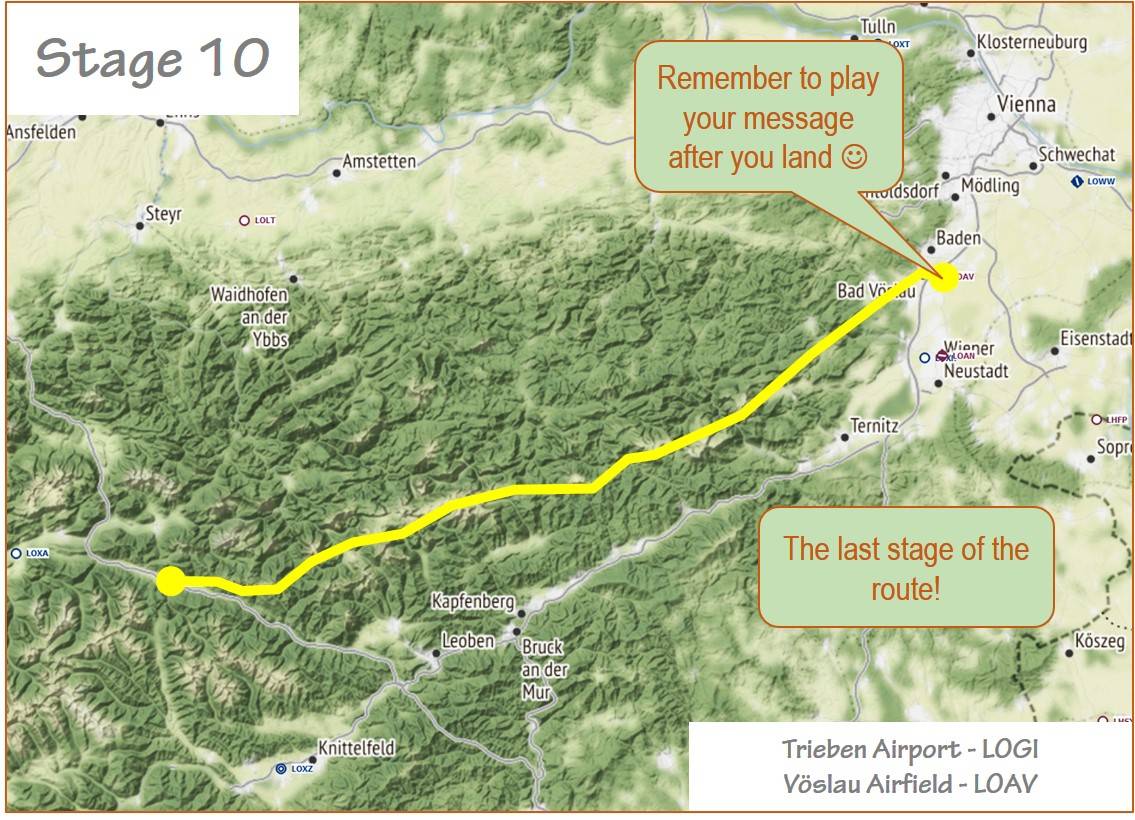
- LOGI – Trieben
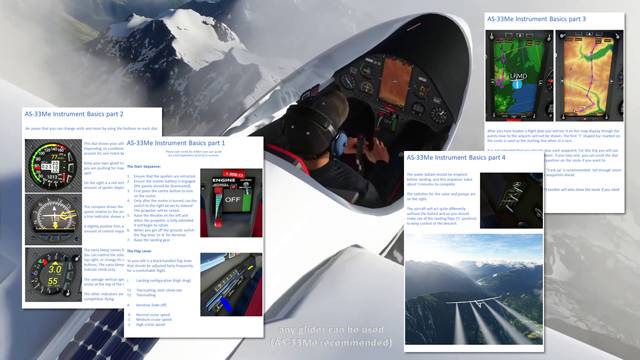
The AS-33me Instruments & Controls
Refer also to the help and instructions provided with the AS-33ME download itself.
Please refer to the AS-33me’s own user guide
for a full explanation of all of its controls.
How to Dismiss & Recall the Tow Plane
- If you prefer to use the built in propeller, but the tow plane appears because you forgot to change your sim settings, you can dismiss it by pulling the yellow cable-release handle.
- If you change your mind, you can re-attach the tow line by pulling on the cable-release handle a second time.
- When you want to start the tow plane, move your rudder left and right. You will see your helper on the left wing signal to the tow pilot to begin.
Starting the Engine
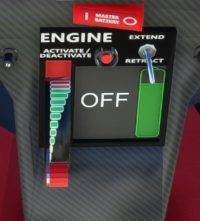
- Ensure that the spoilers are retracted.
- Ensure the master battery is engaged (the panels should be illuminated).
- First press the centre button to turn on the motor.
- Only after the motor is turned can the switch to the right be set to ‘extend’. The propeller will be raised.
- Raise the throttle on the left and when the propeller is fully extended it will begin to rotate.
- When you get off the ground, switch the flap lever to ‘A’ for Aerotow
- Raise the landing gear
Flap Lever Options
To your left is a black handled flap lever that should be adjusted fairly frequently to optimise your flight. The original controls were L, T2 T1, A 0, -1, -2 they have now been replaced by L, 6, 5, 4, 3, 2, 1 which has adds an extra cruise speed.
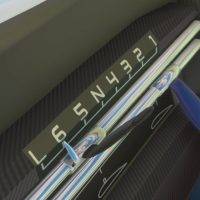
L = Landing configuration (high drag)
6 = Thermalling, best climb rate
5 = Thermalling
N = Neutral for aerotow take-off
4 = lowest cruise speed
3 = cruise speed
2 – Medium cruise speed
1 – Highest cruise speed
Altitude & Speed
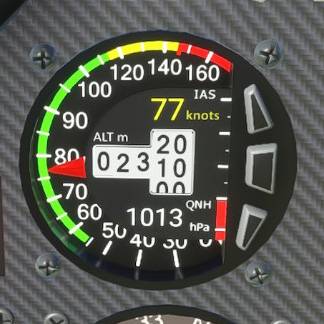
This dial shows your altitude and speed. Depending on conditions you will stall at around 50, one notch below the green line.
Keep your eyes glued to the 50 value when you are pushing for maximum lift in a tight spot.
On the right is a red vertical line showing the amount of spoiler deployed.
Compass & Wind Direction
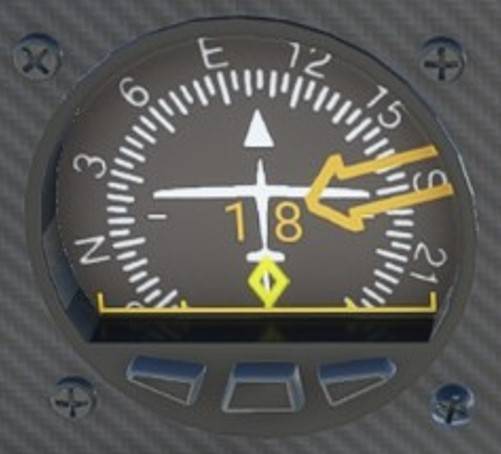
The compass shows the wind direction, and speed relative to the aircraft.
At the base is a trim indicator shown as a yellow diamond. A slightly positive trim will reduce the amount of control required on the stick, making flying a little easier.
Vario and Audio Feedback
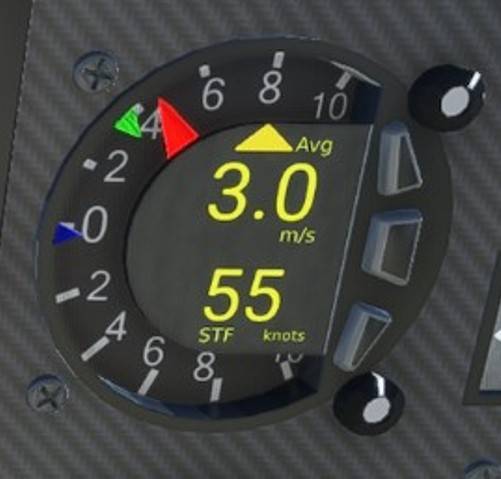
The vario bleep comes from this instrument. You can control the volume with the knob at top right, or change its settings using the 3 buttons. Note: The audio can be set to indicate climb only.
The average vertical speed is shown with an arrow at the top of the dial.
The other indicators are useful for competitive flying.
The Map, Thermals & Route Display
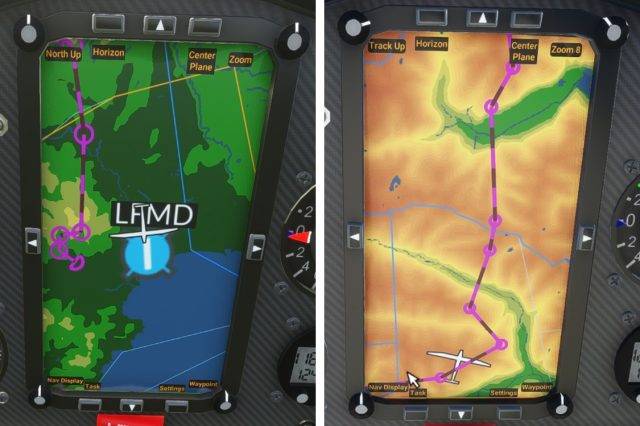
The Map
You can select the map style by rotating the knob at the top-left of the map display. You can make the top of the display either ‘North’ or ‘current direction’ by clicking once on the rotary knob at top-left. The rotary knob at top-right controls the zoom level.
The Flight Plan
Before you start a flight, load the flight plan into Microsoft Flight Simulator. When you arrive in the AS-33me cockpit you will see that the flight plan is loaded on the map display. The waypoints connected to the airports at either end of the route are not displayed. The first and last waypoints are marked on the route with a semi-circle.
How to Traverse the Route
- Set enough zoom on the dial at top right to see a few waypoints ahead
- Be aware that the MSFS map will also show the route if you need it
- Clear each waypoint in turn and confirm it with a text notification from the AS-33me’s display when you do. The forward rolling dotted line will move to the next leg of the route.
- Bear in mind that the direction the dotted line is moving show you the direction of the next waypoint – this helps a lot if you get confused with your orientation.
- Sometimes you may need to put in some extra effort to ascend to a waypoint and this will not be shown on the route.
- If you miss a waypoint you can scroll the dial at the bottom-right to change your active position on the route if you want to.
- The tracking option to the top-left can be changed by clicking on the button. ‘Track North’ is recommended if you want to have a better idea of how far along the route you are. ‘Track up’ makes it easier to decide if you want to make a left or a right turn at a waypoint.
- To change the map type, rotate the button at the top-left.
The Thermals Display
You can add an ‘altitude velocity’ map to the top half of the map display by clicking through the options at the centre-left button at the top of the display. As your glider rises your track will be a series of green blobs, as you fall your track will be red blobs. Scale the map to enclose the entire area you are using to ascend. The general advice for riding thermals is to travel in one direction only while ascending (i.e. always clockwise or anti-clockwise). Make use of the location with the largest collection of green blobs to gain altitude.
Water Ballast
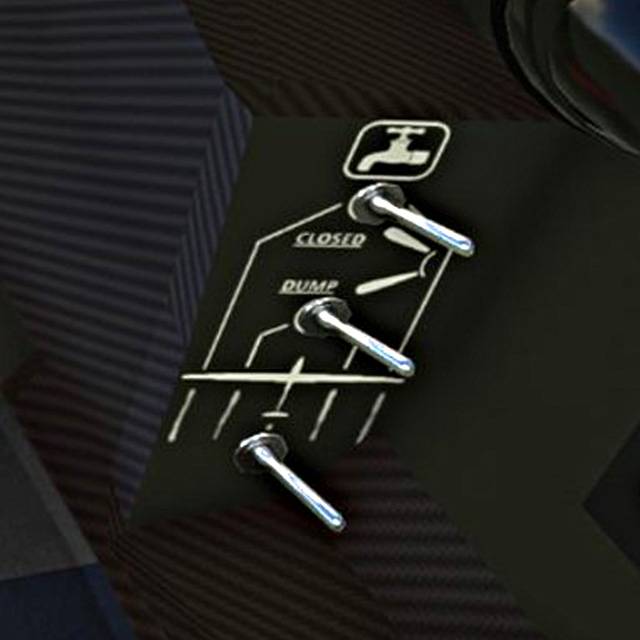
The water ballast should be emptied prior to landing, and this sequence takes about 5 minutes to complete. If you want to be polite, don’t dump the water onto cars or houses.
The switches for the valve and pumps are on the right of the cockpit. Flip all 3 switches downward and water will begin to disperse from the rear of the glider.
The aircraft will become very light and act quite differently without the ballast. Make use of the landing flaps (‘L’ position) to maximise drag and in addition use the spoilers to keep control of the descent rate as you approach an airport.
Miscellaneous Notes
Here are some random thoughts you might want to check out after you have got the basics sorted out.
- Always check to see your spoilers are retracted before you take off.
- Remember to make use of the -2 flap setting if you are riding high on a ridge to convert your altitude into forward motion. That’s a lot more fun than drifting ever higher, but it won’t always be this easy, so make the most of it :0)
- The Alpine Odyssey routes do not show you the places where you may need to back-track or circle to gain altitude. Sometimes you can get more lift by reversing your direction across a ridge a few times.
- Remember that the atmospheric model now includes thermal radiation. Its not strong but you may want to use it to gain altitude if you do find it. Remember to switch on the thermal view (which will sit above the moving map). Zoom out far enough to capture the a good view of the whole area.
- The AS-33me performs best with full water ballast, so don’t be tempted to release the ballast to gain altitude or you will be left with a aircraft wallows in the air.
- If you prefer to use the built in propeller, but the tow plane appears because you forgot to change your sim settings, you can dismiss it by pulling the yellow cable-release handle. The tow plane will turn around and leave. You won’t get a collision detection if it passes through you. Pull the cable-release a second time to get the cable re-attached.
- Microsoft is in control of the tow planes and decides which airports they will be present at. This is not a part of the Alpine Odyssey which was created a long time before the MSFS tow planes and gliders were added.
- Only some of the airports will offer you a tow plane, so you will have to learn how to use the propeller at some point. Remember to fold it away when you reach altitude or it will cause drag.
- Two of the instruments display a red band when you have spoilers deployed. The size of the red band corresponds to how much of the spoiler is in the air stream.
Practice Routes
Practice Route 1
This is a straight line route following a ridge into the wind. This will give you a
chance to acclimatise to the glider and its instruments.
Practice Route 2
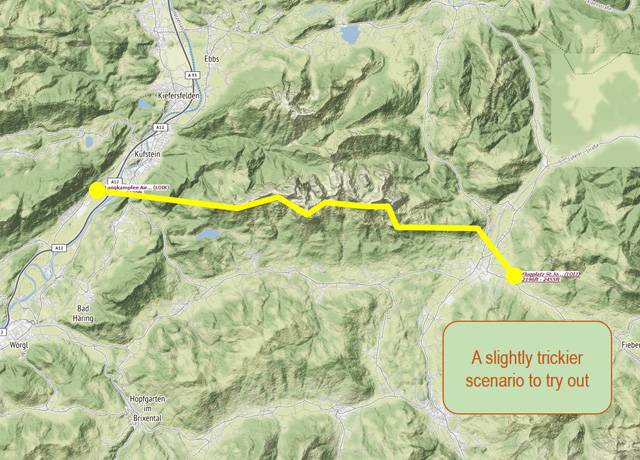
This route is a little less straight forward to manage than route 1 since it contains a stepped slope that harbours dead air. Enter the start of the route at 1000m and exit the ridge over the top of the last peak at the eastern end. When you can manage this exercise you will be ready to begin the Alpine Odyssey.
The Alpine Odyssey Route


The Alpine Odyssey is nearly 1000 miles long and has 10 stages starting on the south coast of France. You do not need to interact with the waypoints on the moving map if you have one, just use them as a guide to show the way. By default you will use the southerly 18 knot preset, but other wind speeds are included if you prefer.
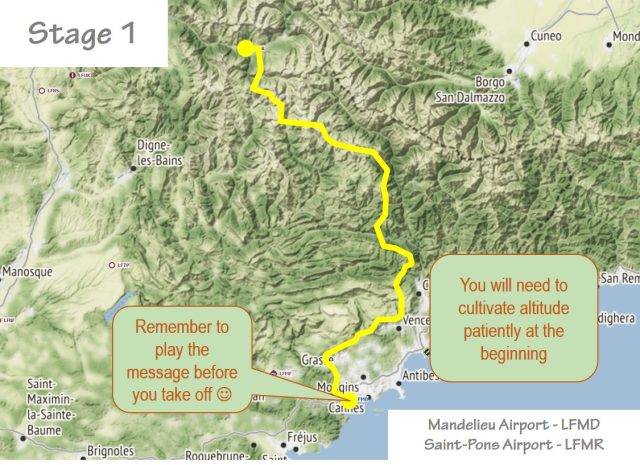
Stage 1

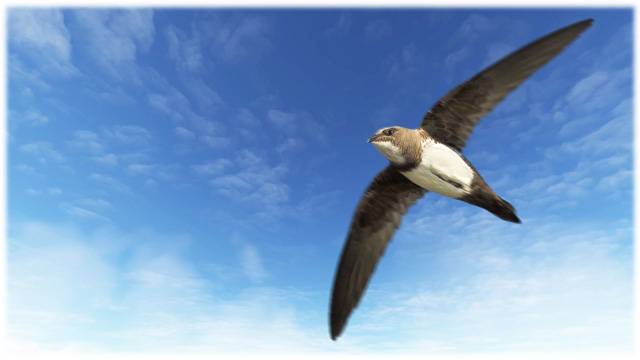
David Attenborough
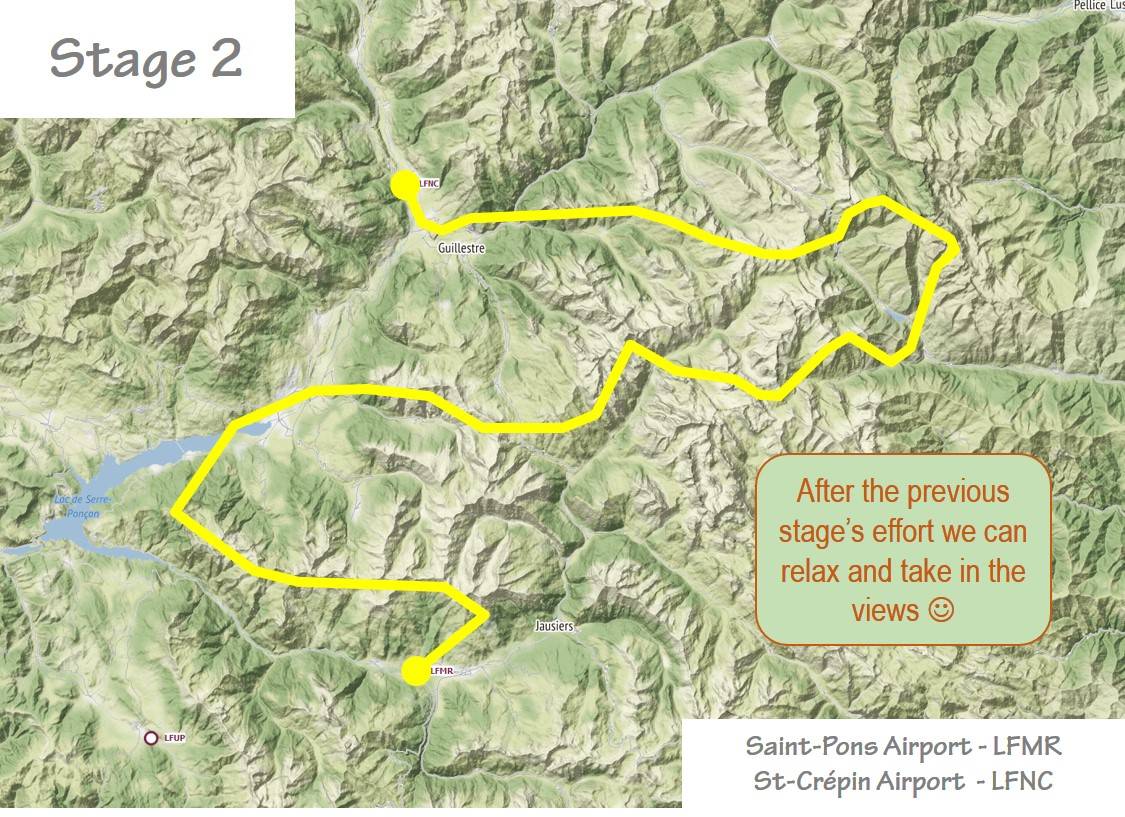
Stage 2
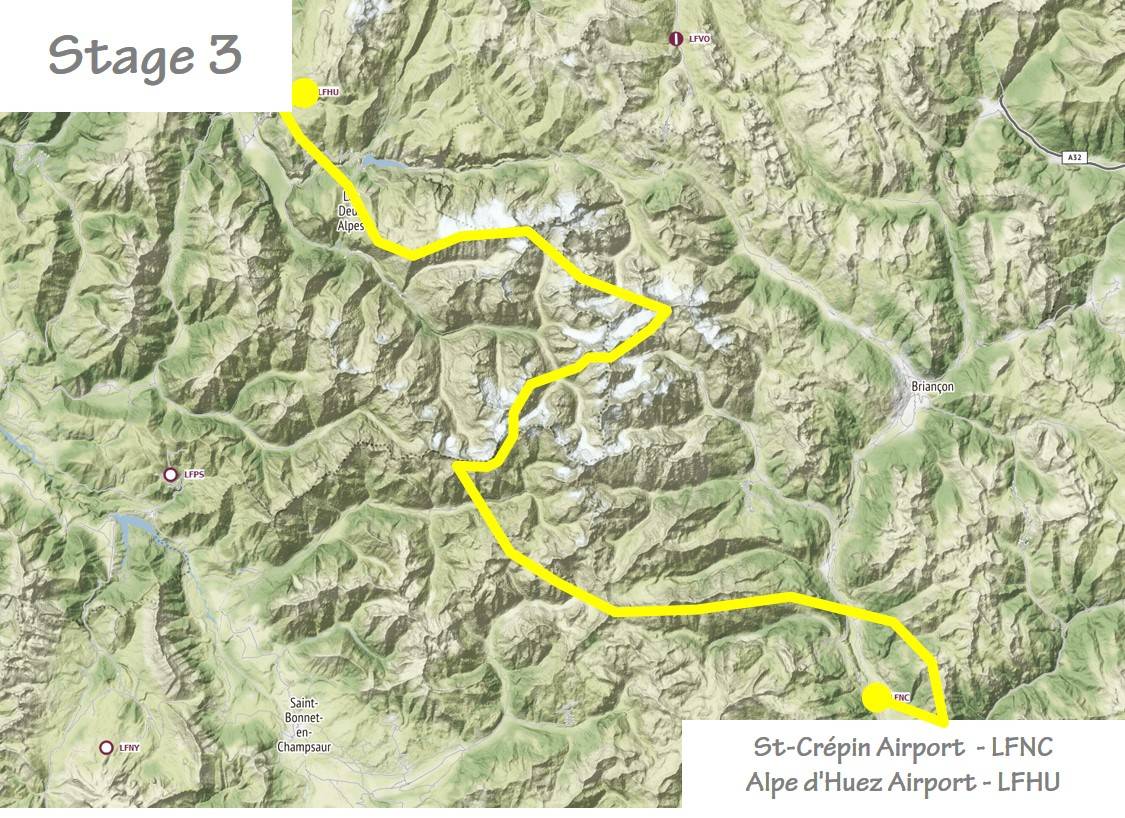
Stage 3
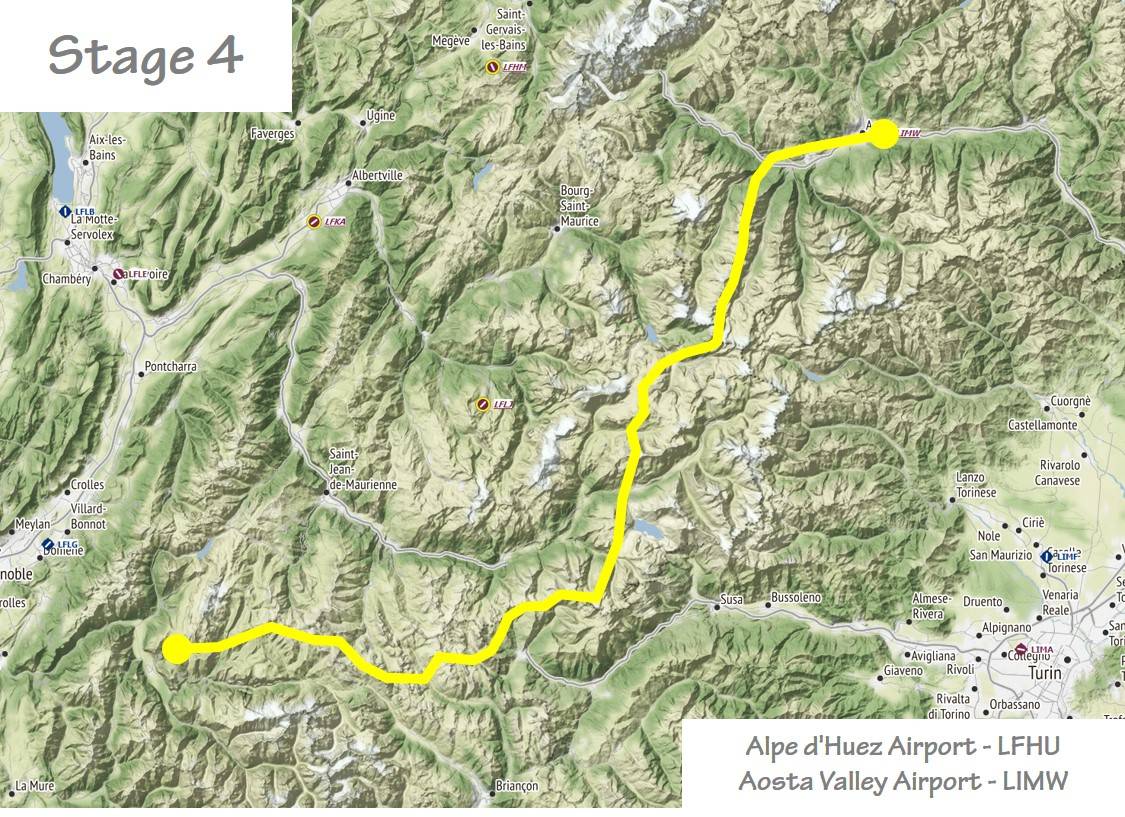
Stage 4
Stage 5

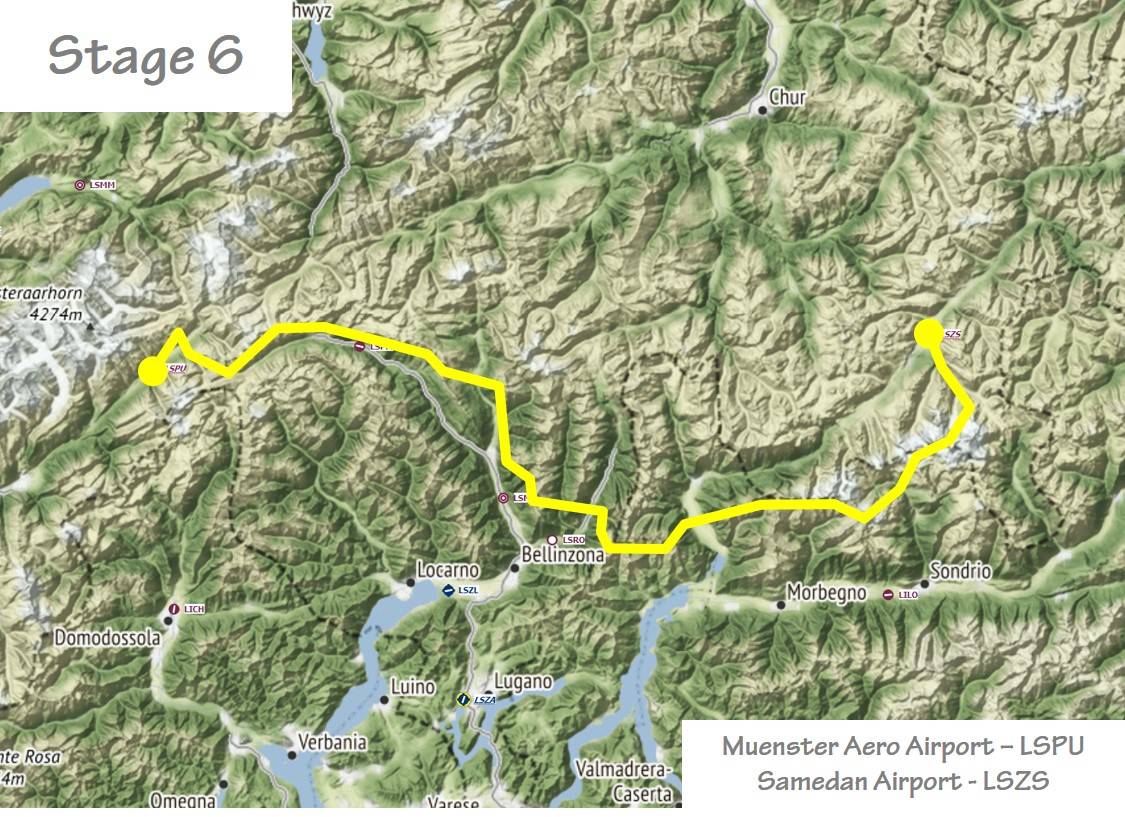
Stage 6
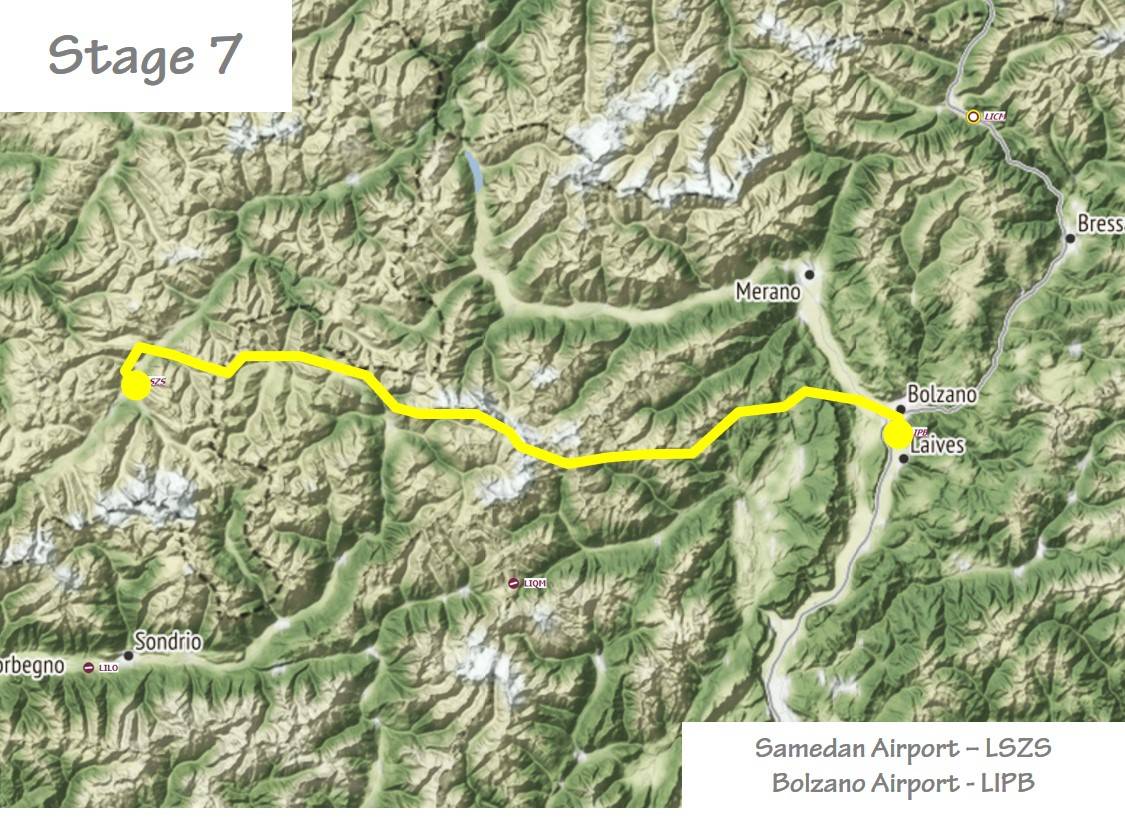
Stage 7
Stage 8
Stage 9
Stage 10
Frequently Asked Questions
Can I use a different glider?
The route was created using the AS-33me and the AS-33me has several controls that will make the trip much more enjoyable:
- Dedicated flap controls for speed, thermals and landing
- A moving map showing the route, waypoints and optionally thermals
- A wind indicator to tell you what angle you have to the prevailing wind
So if you use a different glider you may be making things harder than necessary.
Why Only One Weather Preset?
The intention is to focus your skills on using ridge lift in the Alps. This is best achieved by having consistency in the weather. Having said that, the weather in the ‘adventure’ preset has been carefully crafted to provide a variety of environments that change subtly as you traverse the Alps and are forced to fly at higher altitudes.