
Track Mastering for Dummies
This article will help musicians understand the technical aspects of mastering and provide the steps to master their own tracks to a reasonable level.
Page Contents
What to Expect
About the Author

I’m not an expert so if you want one of those you’ll have to move on… nothing to see here.
The good thing about not being an expert is that I know how hard it is to figure out the basics. An experienced engineer probably doesn’t differentiate the steps and has forgotten what it’s like to not have a clue. That’s where I come in handy :0)
The main problem with finding out what to do is getting too much information so I’ve tried to pare it down to the minimum so you can see what the foundational moves are.
What is Mastering?
Mastering has more than one function but the point of this article is Optimising for Distribution. Here is the complete list of reasons:
- Optimising a track for distribution
- Modifying the sound of a track tonally for artistic reasons.
- Balancing the tone of a track so that its contents make a cohesive whole.
- Balancing multiple tracks so that they can be released as a set, for example, an album or a CD. The individual tracks might come from different countries and producers.
Mastering Your Track
When you have finished mixing your track, it will need to be optimised for distribution to your audience. Your mastering will be affected by:
- The genre of music
- The destination of the output, for example, streaming services, CD, vinyl, video or film.
- Artistic considerations, for example, shaping the tone.
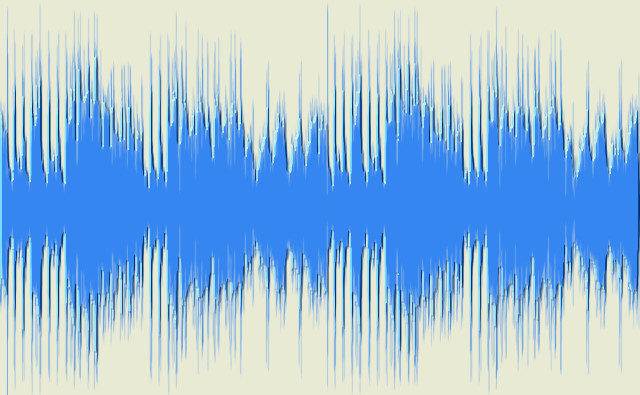
Prior to mastering, your track might sound quieter than commercial tracks. These are the things that may account for the difference:
- Transient volume spikes
- Low-frequency sounds
- A wide dynamic range
These issues will be tacked by three different tools that are part of your editing software.
What Basic Mastering Will Do
If you follow the steps outlined here, you will be:
- Removing low-frequency energy that can’t be heard.
- Making the details clearer by compressing transient volume spikes and raising the average volume.
- Increase the overall volume if necessary to utilise your distribution routes, for example, CD and streaming.
These steps are a part of what all commercial tracks go through. If you were happy with the original mix, you will have a good result. In terms of Pareto’s 80/20 principle, you will have covered 80% of the work and that might be all you need.

What Basic Mastering Won’t Do
Your original sound will be louder/clearer but any problem areas in the original mix won’t be tackled.
The extra steps that could be taken are enhancing buried information, solving problem areas and shaping the tone to enhance its feel. In terms of Pareto’s 80/20 principle, this is the 20% that takes an increasing amount of time and money to achieve.
Things You Need to Understand
The most important purpose of mastering is to optimise your audio files to fit nicely into human perception and the capabilities of reproductive equipment. That is achieved by removing the lowest frequencies, expanding the mid-range and increasing the volume where necessary.
Frequency Limits
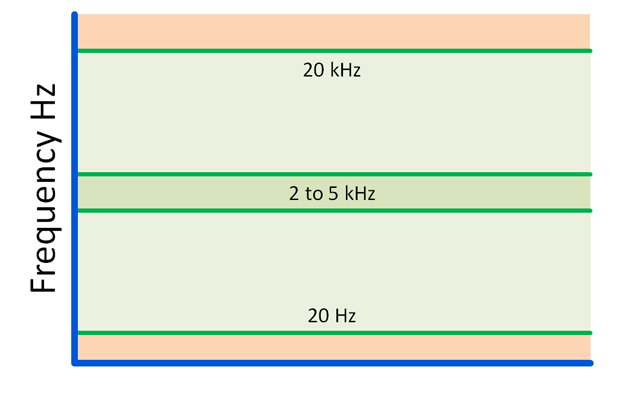
A healthy young human can hear sounds in the range 20 Hz to 20 kHz. We will use this information to remove inaudible sound energy from a recording. The energy recovered from the inaudible range can be used to boost the interesting parts instead.
The ear responds well to frequencies between 2 and 5 kHz so anything falling in that range will sound louder.
The Units of Volume
We will be thinking in terms of decibels (dB) and LUFS which stands for Loudness Units Relative to Full Scale.
- Volume is an absolute physical measure in dB’s
- Loudness is a perceived volume in LUFS
- The LUFS scale is a slight distortion of the dB scale. In some places it is compressed, in other places, it will be stretched. 1 dB = 1 LUFS on average.
Although these values are very similar you will need to differentiate dB from LUFS to be clear to yourself and others when you want to work with perceived loudness (LUFS) or measured loudness (dB).
Perception of Equal Loudness Contours
A 1933 study of audio perception was carried out by Fletcher and Munsen who were studying frequency vs volume vs perception. Their work has been revisited and refined many times since. The results reveal how mixing and mastering are affected by audio volume and frequency.
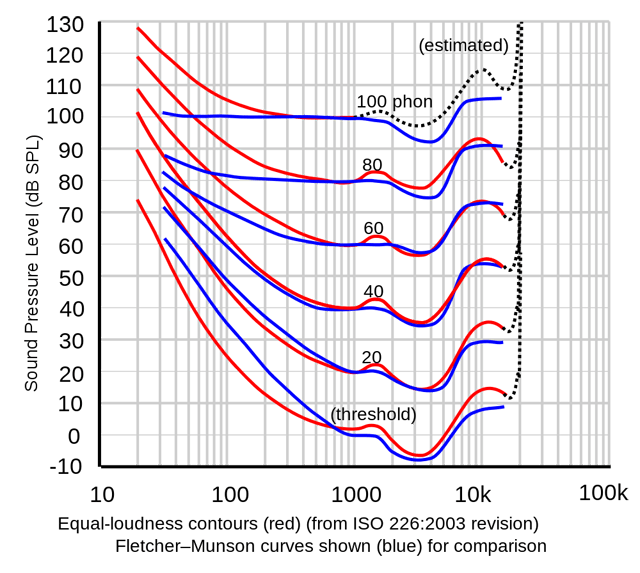
The red lines are equal volume contours. The blue lines are the perceived volumes reported by a sample of the population. The practical result for mixing and mastering is that:
- Low frequencies are quieter than high frequencies.
- Low frequencies will sound quieter when the playback volume is low than when is high.
- dB metering is less useful than LUFS metering (perceived).
To allow for these effects you should master at loud and quiet volumes.
Loudness
The LUFS standard is supposed to free musicians from having a specific loudness value. Having said that there are constraints in the system that need to be catered for.
The Maximum True Peak Value (dB)
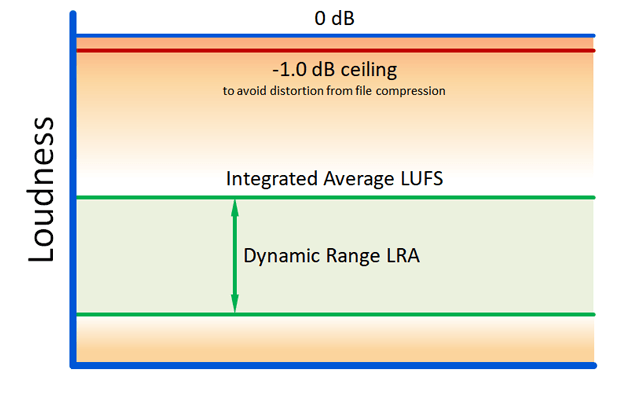
Your music will be compressed for transport by streaming services at some time in its existence. Music with high true peak values can suffer from clipping and distortion during transcoding. The solution is to ensure that the maximum true peak value in your track doesn’t approach 0 dB. The actual safety margin required depends entirely on the contents of the track but -1 dB is usual. Use -2 dB for particularly loud music.
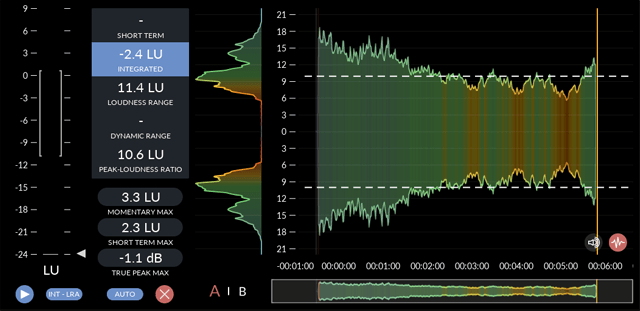
The Dynamic Range
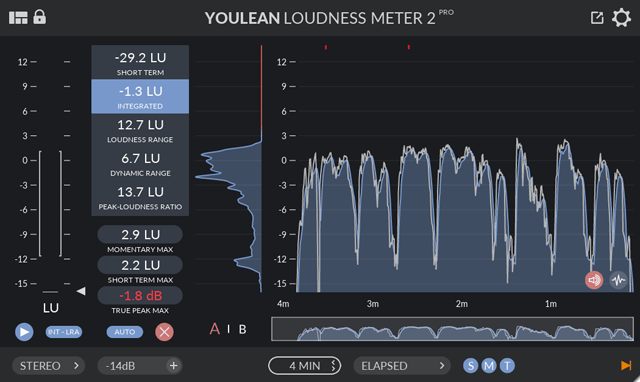
LRA is an averaged value. It’s a useful indicator of the dynamic range, but not the same thing. The loudness range (LRA) shown here is 9-12 LUFS which is considered healthy for a track with loud and soft sections. Continuously loud music will have a low LRA and that’s fine.
A 12 LRA difference means the minimum value will be 1/16th as loud as the integrated average LUFS.
LUFS Target Value in Theory
Consider that the loudness value you are mastering to isn’t controlled by the volume knob for your headphone or speakers, they are two different things. The reason I say this is to illustrate that when mastering you are actually focussing on how the track sounds, not how loud you set your speaker or headphone volume.
If you alter the loudness of your speakers, the perceived strength of the low frequencies will alter unless it’s compensated for by the replay device. This will happens with any LUFS value you choose.
So although I have a serious desire to have a single acceptable target number to work with, I’m not supposed to need one once the LUFS standard is adopted. However, that’s only true if your mix is already louder than the limits used by the cd or streaming services.
LUFS Target Value in Practice
Although the Integrated Average is supposed to be scaled to suit the distribution media, there are a few snags:
- You should have enough space between the Integrated Average and the ceiling so the loudness doesn’t have to be compressed unnecessarily.
- The LUFS standard isn’t ubiquitous yet.
- Some distribution services don’t turn the music up, so you will be at a disadvantage if your average loudness is lower than their maximum.
So in practice, a value comfortably below the ceiling value and above any used by the range distribution media you are interested in will be where your target should be.
Here are some example values:
YouTube: -13 LUFS
Spotify: -14 LUFS
Tidal: -14 LUFS
Apple Music: -16 LUFS
CD: -9 to -13 LUFS
Prepare the Mix
Suggested Checklist
Regardless of the way you created your mix, it will be worth checking in detail before you go into the mastering stage. Here are a few suggestions that you might consider on a per-track basis:
- Solo each lane to see if the recording, editing, processing and volume are what you want.
- Check the processing that is attached to each lane and discard any that aren’t contributing.
- Check groups of lanes where applicable to ensure that all the parts are making a positive contribution.
- Check that the voice tracks are properly controlled.
Ensure Voice Recordings are Ready

Voice recordings are a special case since the loudness of a voice recording can fluctuate a lot due to the singer, the microphone characteristics and the varying distance between the two.
To present the voice tracks properly, it is probable that you will need to adjust the voice tracks in the mixing stage, on a per-track basis. This should be done by manually adjusting the volume envelope (if necessary) and then compressing it.
Adjust the Volume Envelope
By adjusting the volume first you can reduce the amount of work that the compressor has to do and this will reduce the likelihood that the compression will create noticeable artefacts.
To adjust the volume of individual tracks you can deploy a volume envelope. Since I have multiple tracks, I found it easier to see the adjustment to a track visually by cutting the recording into phrases and then adjusting the volume of each segment. The aim of this is to compensate for inappropriate extremes.

Use a Compressor
After you have brought the volume under control manually, you can then apply some compression in order to polish the result. The aim of the compressor is to smooth away volume spikes so the remaining portion can be increased in volume.
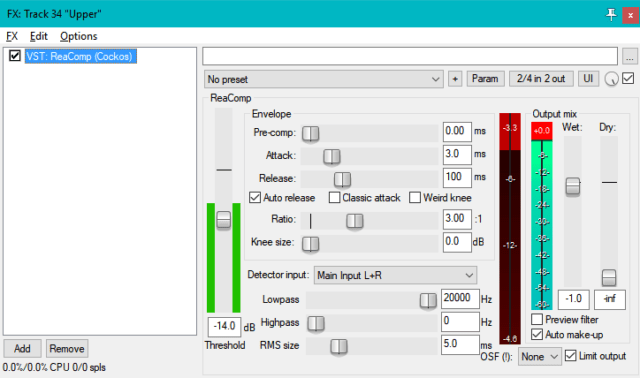
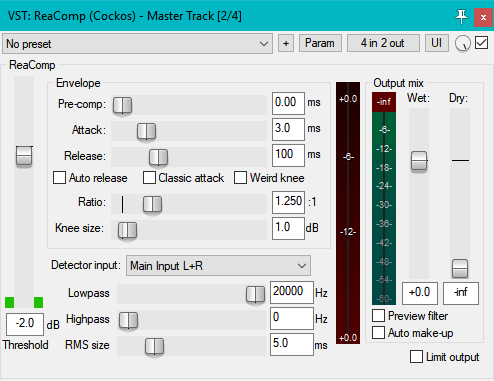
Here are some suggested initial values for Reaper’s ReaComp compressor:
- 2:1 ratio
- 3 to 20 ms attack
- 100 to 500 ms release
- Bring the threshold down far enough (-14 dB in this case) to trigger some clipping in the loudest parts as shown in the OSF bar to the left of the ‘Output Mix’ group.
- Enable Auto Makeup to automatically maintain the volume lost due to compression. This achieves the same result as raising the volume of the track after it has been compressed, but without changing the value of the volume control.
Essential Mastering Stages
Use a Loudness Meter
A loudness meter has its volume measurements adjusted to match the human ear, so it will be slightly out of step with a meter that is measuring the physics without taking into account the listener.
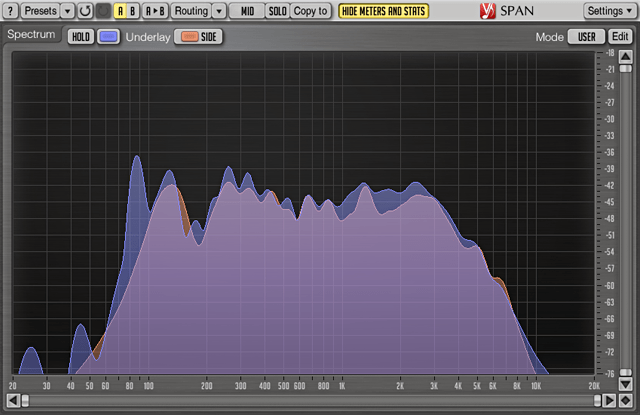
Stage 1: Remove Inaudible Frequencies with an EQ Filter
There is a lot of energy in a low-frequency sound, even if you can’t hear it. The frequencies below 20 Hz can’t be heard by your audience and only substantial speakers can reproduce them. This inaudible frequency range contributes to the measured loudness but not its volume.
For some, having some extra weight in the track is important, but let’s assume it’s not entirely necessary and you didn’t know it was a problem until now. You can remove the extra baggage with an EQ filter, and the settings I have are near the limits of the filter at 20 Hz and 22 kHz so I’m not cutting into the working frequencies unnecessarily.
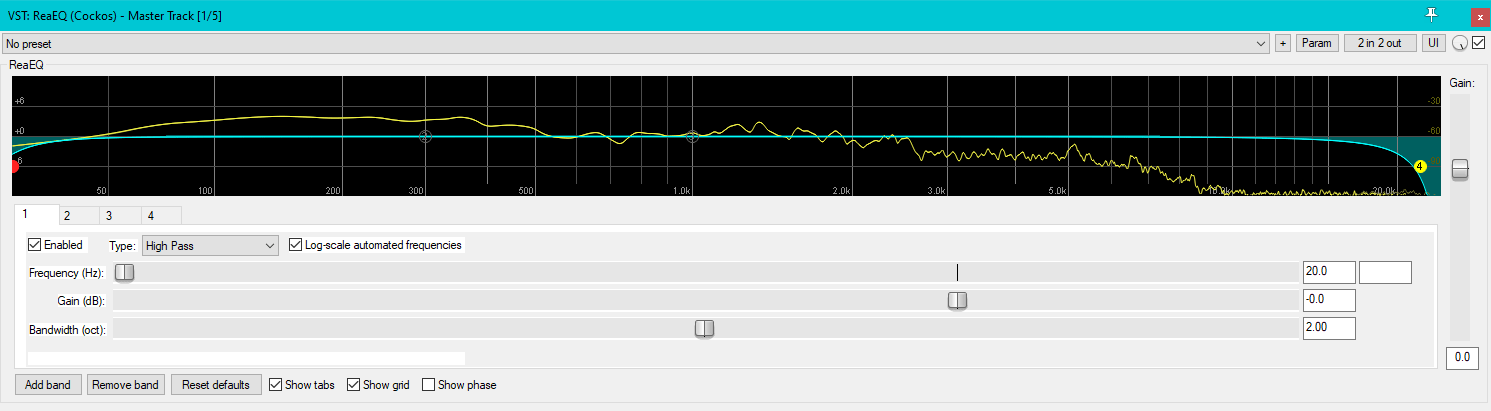
(click on image to enlarge)
High pass filter = 20 Hz, bandwidth 2, the filter is -3 db at 20 Hz
Low pass filter = 22 kHz, bandwidth 2, the filtering is -6 db at 22 kHz
Note: You may want to modify the gain at points along the frequency axis for artistic effect but I won’t be dealing with that in this article.
Stage 2: Smooth Volume Spikes with a Compressor
Transparent compression (gentle compression) is used when mastering, but you may require heavier compression on specific tracks within the mix.
A compressor smooths peak spikes down by compressing the loudest parts of the waveform. This makes room to expand the body of the waveform. In effect, the quieter result can be expanded to fill the room you have created.
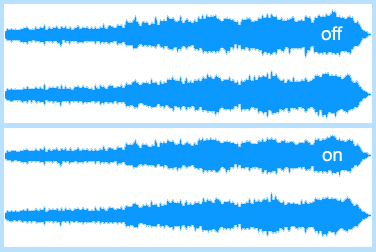
The comparison screenshots show the effect of the compressor on its own. Notice that the compressor has reduced the body of the waveform and smoothed some of the outermost volume spikes. This is effective but not noticeably intrusive and is referred to as using the compressor Transparently (gently).
For mastering, the compressor configuration should be set for transparent compression. To keep things simple, disable these controls if they exist in your setup:
- High and low pass filtering
- Built-in Auto Makeup
- Built-in Limiting if it exists
- OSF (Over Sampling Filter) previously named AA for anti-aliasing.
You will need to adjust the following settings to get the best sound. Compare frequently with the original sound by disabling the compressor:
- Use a compression ratio of less than 2:1. Start with 1.25:1
- Use a short attack time in the range 30 to 100 ms
- Use a release time that is in sync with the beat of the track. The BPM frequency in milliseconds is (60,000 / BPM). Typical release times are said to be 300 to 800 ms and this is useful to know to get a sense of scale.
- Use a threshold value no more than 2 dB
- Use a knee value to smooth the crossover between the compressed and non-compressed portions of the waveform. It should be lower than the threshold dB.
The attack The release time needs to be adjusted to fit in with the rhythm of your track. This is a personal assessment.
The compressor will act when the track volume crosses the set threshold. From then on the volume will be scaled down. You can see this graphically when sharp peaks are softened.
Note: Once you have obtained good results with a compressor, you might want to try out a multiband compressor in order to control different frequency ranges more easily. If so, you should be on the lookout for ringing, noise and distortion originating at the junctions of the frequency bands.
Stage 3: Raise Loudness with a Limiter
A limiter is like a compressor but has a hard limit and a high scaling ratio and is sometimes referred to as a brick wall. Moving the threshold slider down will increase the overall loudness.
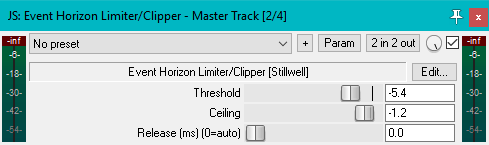
The Ceiling Value
A limiter is intended to limit the maximum volume to provide overload protection. The default value of the ceiling in the JS Event Horizon Limiter is -0.2 dB. to which I add -1 dB to this to avoid causing artefacts due to transcoding a raw file into a compressed format for delivery.
The Threshold Value
The default position for the threshold is zero (no effect). At this setting, the LUFS meter revealed that there was 3.4 LU available to expand the track into. In the second pair of waveforms, the limiter was set to match the available space.
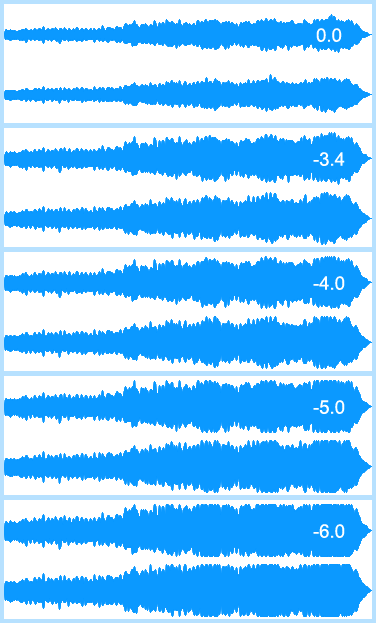
When the limiter is set to -4.0 it is gently smoothing the loudest parts of the track, and this could be helpful. In the end, you have to let your ears decide what sounds best.
I know from listening to a threshold -6.0 there is an uncomfortable discontinuity where the track gets suddenly louder about 1/3rd in. At this point, the voice part is suddenly scaled down. If I reject that setting, I’m left with a threshold range between -4.0 to -5.0 that sounds about right.
Check Your Results
When you have a candidate master, check how it sounds in as many ways as you can. You might not think it necessary to do some of these, but the more you try the better you will know how your hard work is being received.
Here are some suggestions:
- Loud/Quiet
- Mono/Stereo
- Cheap/expensive headphones
- Mobile phone
- Bluetooth portable speaker
- Decent speakers
- Decent speakers but leave the room and close the door
- In a car
Job Done?
If you got this far, you will have completed some basic mastering that will have optimised your track to suit the current LUFS standards and made it sound better as well.
If you feel like showing a bit of appreciation
I have a donations page.
Useful Free Tools Worth Supporting
click image to visit website
Miscellaneous
Additional Mastering Steps
Mastering can be an art form in its own right, and change the feel of a track significantly in some cases. The steps described above are the elementary steps to get the track into roughly the same ballpark as commercial tracks.
Basic mastering should probably include Multi-band Compressors, Stereo Sides and Phasing considerations, so I’ll be integrating this information in due course.
Considering LUFS Targets
I wondered if there was a way I could deduce that it isn’t necessary to use a specific LUFS target. I started researching how a software LUFS meter would make its measurements. The simplest case is to think about how music encoded in a WAV file and how that can be analysed by a LUFS meter.
Let’s consider a standard WAV file containing mono music in 16-bit PCM format sampled at 44.1kHz. The original music source will be a single waveform composed of all the sounds that are in the music.
To store the music, we will use a 16-bit ADC to sample the amplitude of the waveform 44100 times per second. The amplitude will be scaled and quantised to a signed 16-bit value. This will be a number in the range 0 (no volume) to +/- 32768 (full volume). Each sample is written to the WAV file.
From this we know the following:
- The original frequencies are reproduced when the samples are replayed at the original speed.
- When properly recorded, the stored amplitudes will be scaled to fit the number range.
- The maximum volume (0 LUFS) must not be louder than the largest number this file format can hold i.e. +/- 32768.
Knowing the above, we can also be sure that the replay volume of the track can be scaled arbitrarily using the volume control. This illuminates the fact that the values you are obtaining from metering are a measure of the file statistics, not the replay volume you are currently using.
As long as you are within these constraints:
- The music stays below -1 dB to allow for distortion due to file and streaming compression for distribution purposes.
- The integrated LUFS are equal to or higher than the requirements for your chosen music distributor who may not turn your music up if its lower than their average.
the actual integrated LUFS value you use doesn’t matter because the volume of the waveform is scaleable.
Youlean Loudness Meter
Dynameter
Recommended Links
- Reaper
- Youlean Loudness Meter
- YouTube – Mastering in 5 Steps
- Mastering 101 – Compression
- Compression in mastering
- Basic FX Compression
- Compressing a voice track
- Mastering Audio
- Dan Worral
Other References
- Limiter vs Compressor
- Level Matching
- YouTube – Mastering Essentials
- www.animations.physics.unsw.edu.au
- artists.spotify.com
- productionadvice.co.uk
- YouTube – Compression
- Audio formats