MSFS: Windows Environment Settings
In this article we look at the settings that contribute to the Windows environment in which Microsoft Flight Simulator is running.
Page Contents
- 1 Windows Game Mode
- 2 CPU Max Setting
- 3 Default Graphics Settings
- 4 Windows Power Plan
- 5 Turn Off Windows Fast Start
- 6 Graphics Performance Preference
- 7 Performance Allocation to Foreground or Background
- 8 Background App Processing
- 9 Core Isolation
- 10 Disable Windows NDU
- 11 Memory Compression
- 12 Game Bar Settings
Windows Game Mode
Location:
- Type Game Mode in the taskbar search box
This one depends seems to depend upon your system configuration, so try it both ways. MSFS Zendesk support has recommended that it be set to ON.
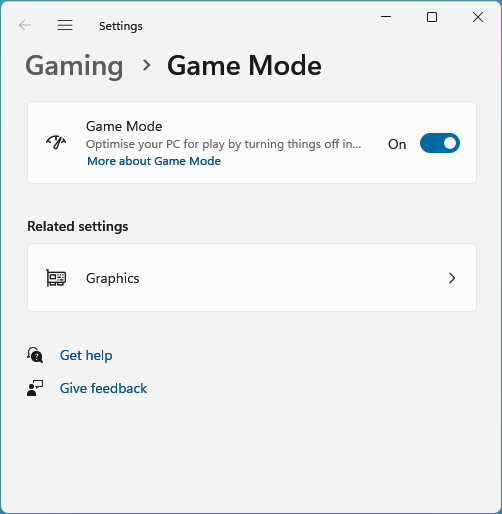
In theory Windows Game Mode will prioritise the game and prevent background downloading, driver updates and ‘restart’ notifications.
CPU Max Setting
Previous Alterations
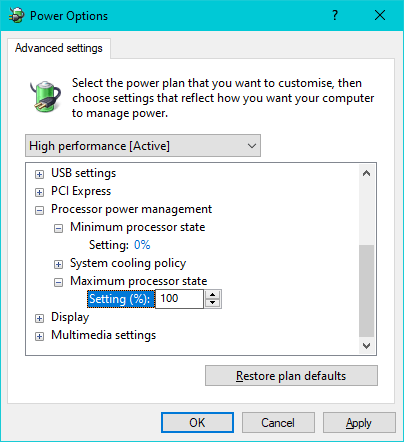
If you have ever changed the Maximum Processor State then its worth going back there to check that you turned it back to 100%.
Location:
- Type Power Plan in the taskbar search box to open your Power Options dialogue.
- Select: Change Plan Settings
- Select: Change Advanced Power Settings
- Find: Processor Power Management
Why Lower Maximum Processor State?
It can be useful to turn down the Maximum Processor State in order to prevent your CPU from reaching excessive temperatures during long running calculations in some programs.
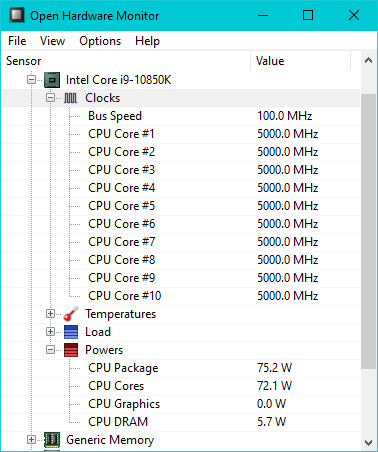
This happens with the Handbrake video converter which did not give the CPU a rest and drove the temperature to over 90°C, uncomfortably close to its limit. By adjusting the Maximum Processor State to 99% the heat of the CPU dropped by 15°C. The CPU should protect itself via thermal throttling, but I’d rather not be in that position in the first place. However, with the CPU at 99%, the clock frequency for the CPUs dropped back to their base frequency of 3600 MHz.
Default Graphics Settings
Location:
- Type: Graphics Settings in the taskbar search box
- Select: Change Default Graphics Settings
Each of the settings are discussed below.
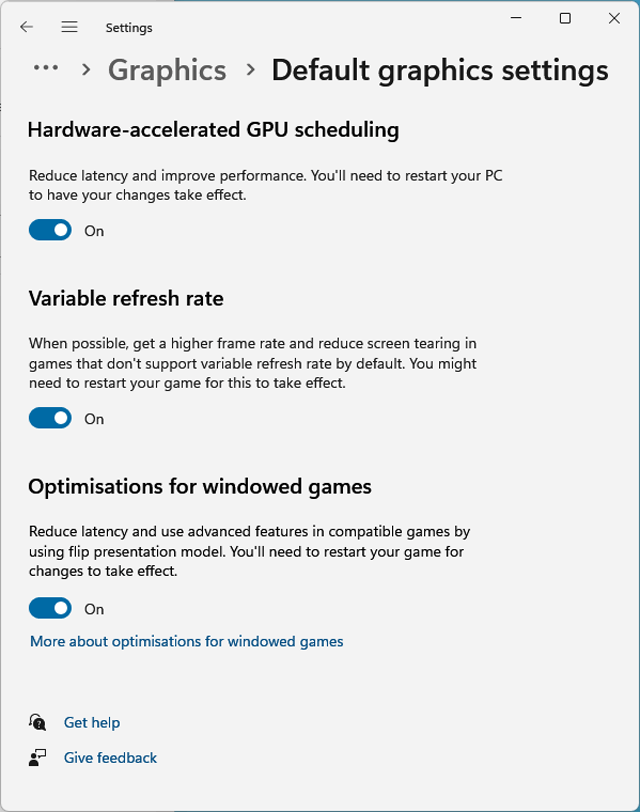
Hardware Accelerated GPU Scheduling (HAGS)
When ‘on’, this setting will move time-slicing from a high-priority thread to the GPU hardware, which is strictly enforced.
For the Quest 3, HAGS has improved image quality and should be switched on.
In the Rift S I found this option to be a little harsh compared to the software equivalent and was visible in the micro steps made by the landscape as it passed by.
The biggest difference between GPU scheduling or not is how the system reacts to overload. The GPU scheduled version is strict and tends to micro stutter more noticeably and more often than the non-GPU version. The non-GPU version has a softer response, which is a plus, but the mouse became inactive fairly often when in Windowed mode which I was using to help the testing. No doubt, this effect came and went as the GPU usage exceeded 90% capacity but moving the sim from windowed mode to full screen mode cleared that problem up.
Variable Refresh Rate
When ‘on’, this setting will support adaptive rates in DX11 games. Adaptive rates will allow increased frame rates when possible. The extra frames will aid ASW/Reprojection which uses the most recent frame to generate a new frame when required. Younger frames will require less reprojection than older ones, so the end result is more accurate and should cause less smearing.
If you are aiming for a constant 30Hz refresh rate backed by a matching ASW / Reprojection value of 30, this value should be set to ‘off’.
Optimisations for Windowed Games (on)
This setting provides faster algorithms for displaying games in a windows. Windowed mode allows you to ALT-TAB away from the game UI do do other things.
Windows Power Plan
Location:
- Type Power Plan in the taskbar search box to open your Power Options dialogue.
You don’t need to choose a high performance power for MSFS since it will take the required power as necessary. You can leave this setting at normal unless you need to prevent various parts of your system from shutting down to save energy.
You should check to see what your power options are set to currently. As you can see in the Graphics Performance Preference section, you can set the power plan and thread priority to high performance just for MSFS.
!! Warning !!
High Performance on laptops since will degrade the battery faster than the savings modes.
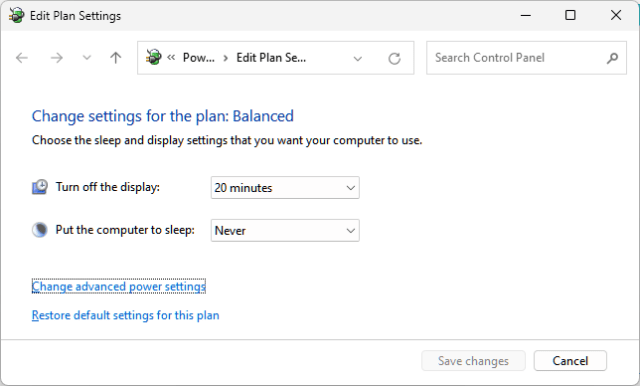
Benchmarks on my GPU using both the high performance and balanced options revealed the surprise result was that the balanced power mode scored better than the performance mode.
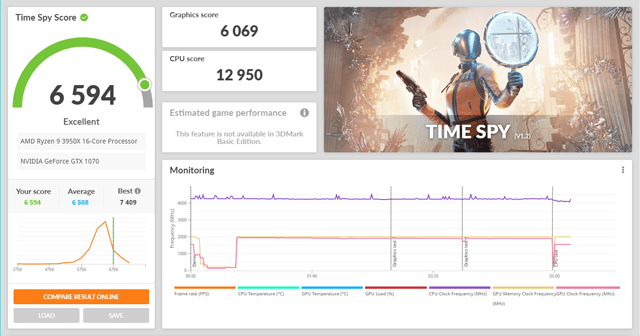
has a better score than the High Performance plan.
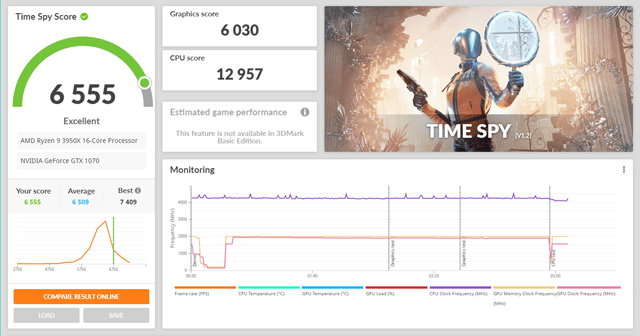
is less than the score for the balanced plan.
Turn Off Windows Fast Start
The Fast Start option saves the current state of your computer so you can get to work quickly. MSFS is a complicated piece of software so you do not want to save any bad states for next time. Turn off the Fast Start option so that you can completely reset your computer’s memory, giving all the addons the best chance to work nicely.
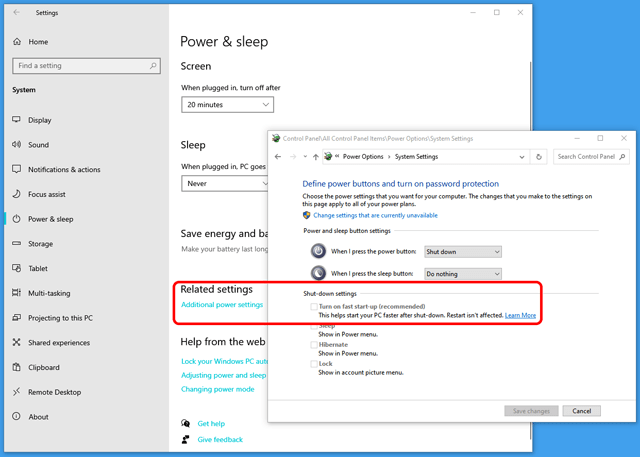
To find the option in Win11
- Old Control Panel (as embedded desktop app)
- Hardware and Sound
- Power Options
- System Settings
- Shut-down settings (title)
- Turn on fast start-up
Graphics Performance Preference
- Start > Settings > System > Display > Graphics
By using the Graphics Performance Preference there will be no need to set a high performance plan for the whole computer, and no need to manually raise the thread priority of the flight sim executable each time you run the sim – this will happen automatically.
Processes started by a user or administrator will have a root thread priority of 8 (‘normal’). When the MSFS executable is set to High Performance mode it’s root thread priority is set to 10 (‘above normal’).
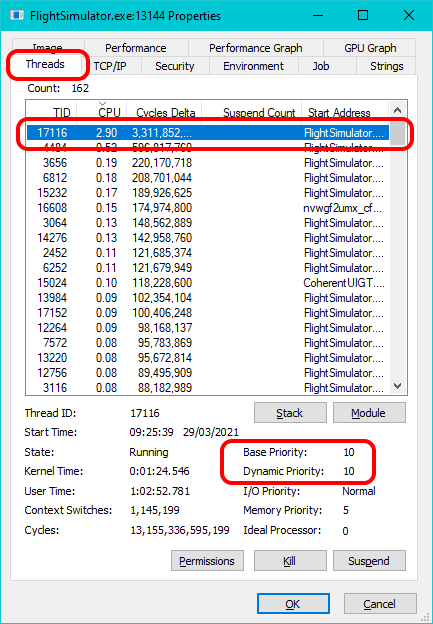
Note 1:
Task Manager’s thread priority ‘set’ command has a pre-selected option that doesn’t necessarily represent the current thread priority value displayed in other applications. I assume that Task Manager does not read the current state of the thread in order to build its settings menu although it does remember and display its own internal state.
Performance Allocation to Foreground or Background
Location:
- Type Performance into the taskbar search box
- Select the result entitled Adjust the Appearance and Performance of Windows
- Select the Advanced tab
or
- Start > Right Click Menu > System > Advanced System Settings (on the right hand side)
- In the dialogue select the ‘Advanced’ tab
- Choose an option in the ‘Processor Scheduling’ group
The dialogue related to this section is called Performance Options. On the advanced tab, you can choose to give background services priority over foreground programs. This is something you would normally set for a server since the user interface is not the main priority of the machine.
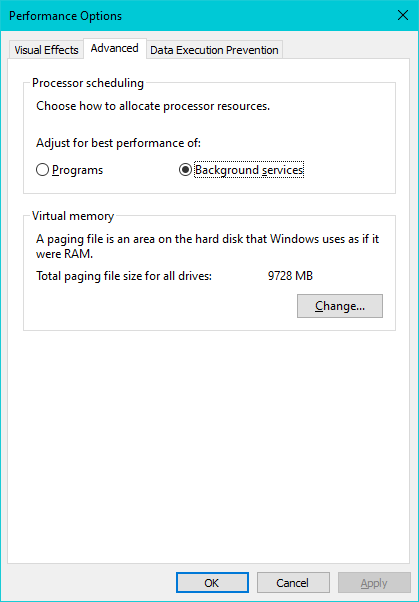
There is divergence of opinion on how to handle the execution priority of MSFS:
- Pump it up to max power (see Graphics Performance Preference)
- Change Windows to prefer background services. This might allow the headset and other processes to run more smoothly.
Enhancing background support contradicts other advice in this article series that suggests you set MSFS to a higher priority. You will need to bear in mind that there is more than one way to configure all of the available options to reach your goal and experiment to find the combination that works for your hardware and preferences.

Background App Processing
Location:
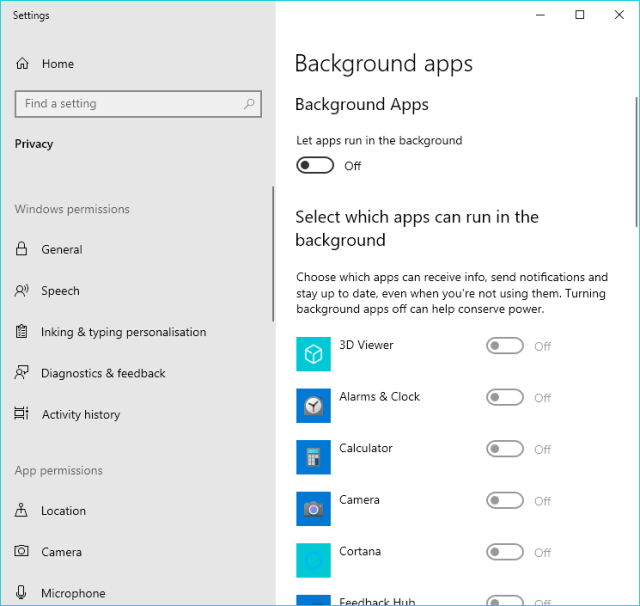
- Type Background Apps In the taskbar search box
These apps can run at the same time as MSFS, and may degrade your flight experience. Although you can turn them all off with a single click, Microsoft Flight Simulator also appears in this list as well, so review them individually.

Core Isolation
Location: type Core Isolation into the task bar search box
This is a security feature that adds about 10% to the FPS if it is on. On my computer it was already in the ‘Off’ mode, so it might well be part of a defensive response to a malicious threat as opposed to a permanent shield.
Disable Windows NDU
I think this one is best ignored unless you are having significant problems, so I won’t show the actual fix here.
This is what I can tell you about it:
- Google says NDU stands for either Network Diagnostic Usage or Network Data Usage, the common words being Network & Usage. It’s probably a network usage monitoring tool and is linked to an executable called NDU.sys in System32.
- This fix involves changing a registry value, so if you are not sure how to do that then leave it alone.
- You are likely to forget that you have changed the registry and that could cause problems in future.
- The NDU service is said to have the job of detecting USB devices when they are connected to the system. When you disable it, you will no longer be able to detect a new USB device when you plug it in.
Here is a useful video from 737NG Driver discussing it with a realistic attitude, and another by Easyjetsimpilot. The latter’s comments section suggests that for some it makes a big difference, but for others there is little or no change.
Memory Compression
Location:
- You can access this setting via a command prompt / DOS box / Windows Terminal in admin mode
- I recommend you leave this setting alone!
- Note 1: memory compression occurs even if you have an excess of available memory.
- Note 2: Altering Memory Compression will not improve the FPS of a game, as shown in this video by Britec09.
When memory compression is enabled, blocks of memory that are on standby are compressed in order to release up to 70% of its memory footprint to other programs. This is a much faster option than accessing a page file on a disk.
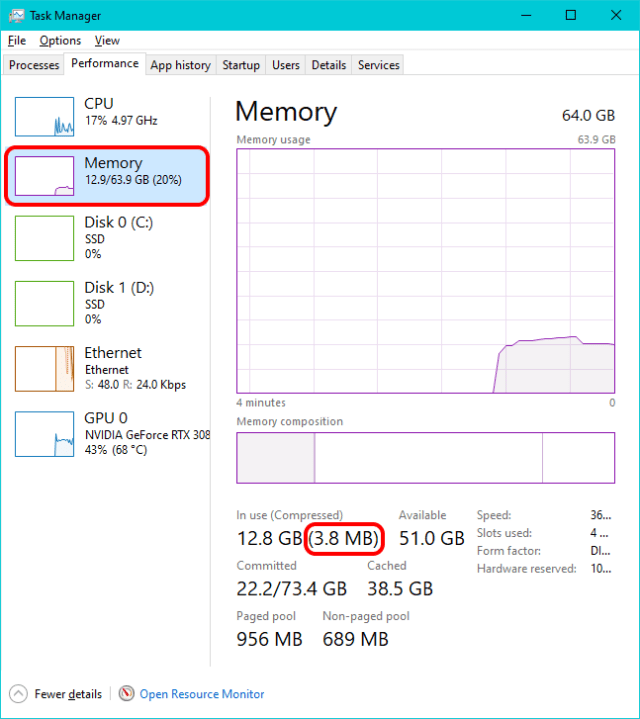
You can find your current memory statistics within the task manager: select the Performance tab, choose the Memory item, and underneath the Memory Usage graph is a memory composition bar. Hover your mouse over it to see the details in a tooltip window. The summary is onscreen as shown marked in red.
Game Bar Settings
Location:
- To open the Game Bar press: Windows Key + ALT + G
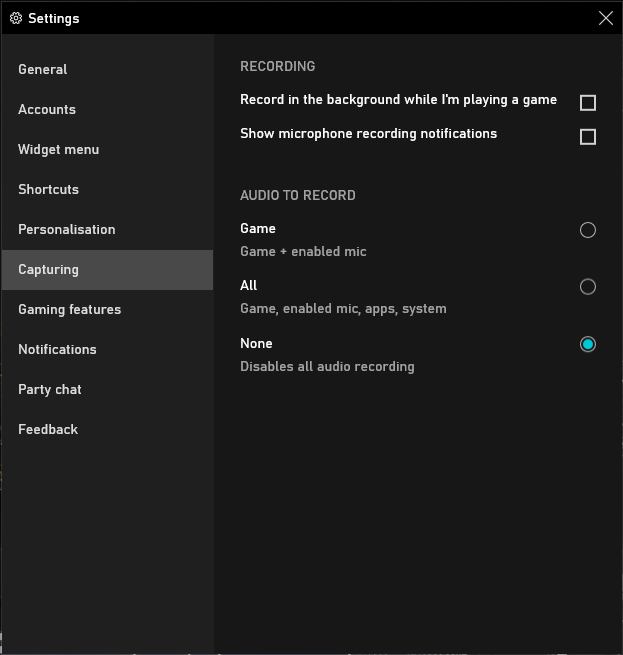
You should disable audio recording if you aren’t using it.
