Microsoft Flight Simulator Basics

The Asobo-Microsoft Flight Simulator is a superb flight sim. Here are a few of the things I have discovered so far.
Page Contents
Trying to Improve VR?
- Once you have VR running you will want to improve the graphics so check this article.
Microsoft Flight Sim Tips
How to Exit MSFS Quickly
Use ALT+F4 and the sim will exit without delay.
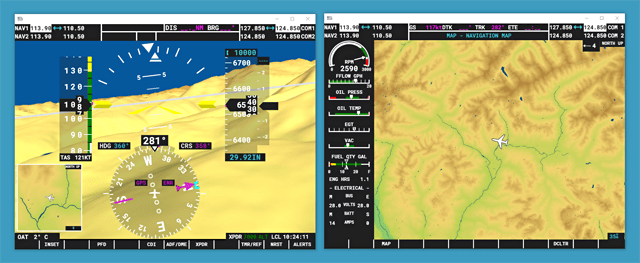
How to Put Instruments on External Windows
- Move the in-game cursor to the instrument panel
- Press Right ALT
- The cursor should turn into a magnifier icon with a + mark.
- Click the left Mouse Button
Aviation
These are some of the things I have learnt while getting to grips with flight sims.
Wind Direction
The wind direction ‘approaching from’ the given direction and is moving in the opposite direction to a runway with the same id. So if the wind is at 24, that is the direction from which the wind will be coming and if you stood there looking in direction 240 the wind will hit your face.
Therefore if the aircraft is approaching runway 15 and the wind is at 15 as well, the aircraft will be flying into the wind.
Runway Names
Runways and wind direction both are both referred to by the first two digits of a compass bearing rounded to the nearest 10 degrees. There are 36 possible runway references from 01 to 36. Since a runway has two ends, each end will be numbered differently and will be at 180 (18) to each other.
For example if a runway is at bearing 240 degrees it will be listed as runway 24. If you are landing or taking off on runway 24, you will be travelling at a bearing of 240 degrees in both cases.
Runway Markers
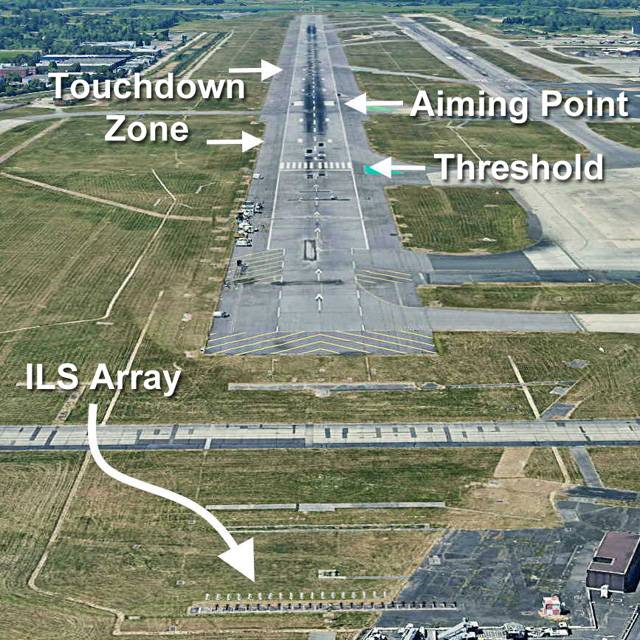
The aiming point is the thicker pair of blocks beyond the threshold. Either side of that are the smaller blocks denoting the touchdown zone. The number of stripes in the threshold is an indication of how wide the runway is. All of the markings on the runway are white and and are of a defined sizes, widths and spaces. Because of the consistency of the markings world wide you will be able to estimate distance visually as you approach.
Marshalling Signals
These are the signals I have encountered in the Sim so far in MSFS.
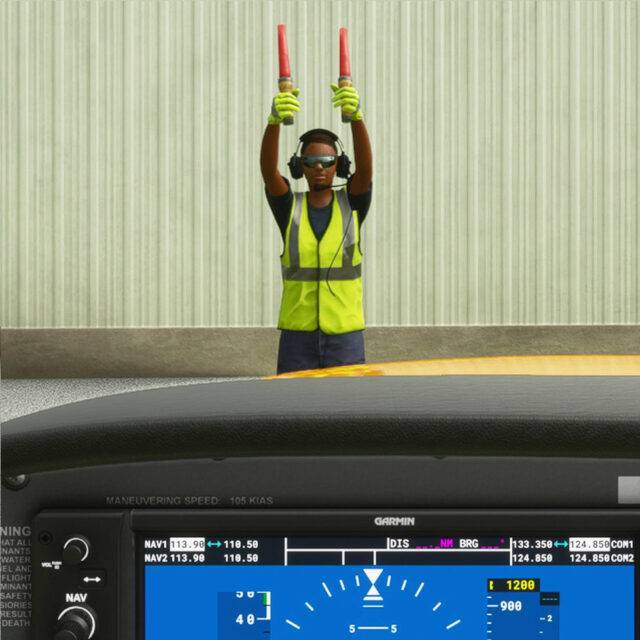

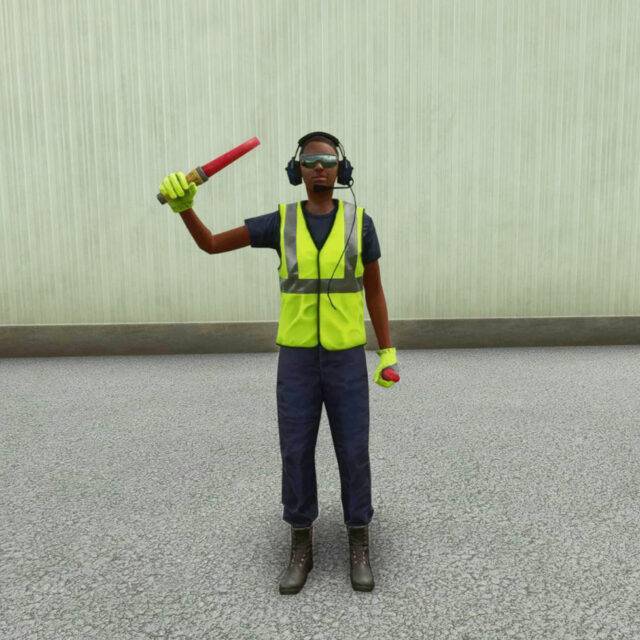
/ all clear

(arms rise as you get closer)

Magnetos
Propeller driven aircraft have magnetos to provide reliable voltage to an engine and are powered indirectly by the engine. The magneto will continue to work once the engine has started, making it independent of batteries and alternators.
There are two magnetos for dual redundancy that serve a pair of spark plugs in each piston cylinder. If only one magneto is operational, the engine will run rough but it will not stop since each of the pair of spark plugs in the cylinder is firing alternately.
Take care to turn off both magnetos in a parked aircraft to prevent accidental propeller movement from restarting the engine.
A pre-flight check of the magnetos will test how well each magneto is operating and may also indicate fouling of the spark plugs due to running on too rich a fuel mixture.
You can get an excellent short description in this video.
A Minimal Cold Start Sequence
There are a common sequence of actions that must be performed for most propeller driven aircraft to get an engine started. In order to make progress with a new aircraft without using the checklist system yo can memorise the 5 stages and eventually the individual generic steps:
- Secure the aircraft
- Ensure parking brake is engaged
- Ensure doors are closed
- Initialise the electrical system
- Turn on battery
- Turn on both magnetos
- Turn on generators if present
- Initialise the fuel system
- Set propeller controls fully forward
- Set mixture controls fully forward
- Open fuel valve(s)
- Prime the fuel system
- Enable fuel pumps or use wobble pump & primer
- Set throttle to 10%
- Start and taxi
- Open switch guards, engage starter, replace guards
- Turn off fuel pumps if present
- Turn on avionics and/or radio
- Contact the tower
How to Execute Slip Manoeuvres
These manoeuvres use the ailerons and rudder to counteract each other so the aircraft does not turn, while maintaining a constant speed. Pitch or power are used to maintain speed.
Side Slip – Landing in a Cross-Wind
Bank the aeroplane towards the direction of the cross-wind and keep the angle steady. Use the opposite rudder to keep the aeroplane parallel to the centre line. Speed is maintained using power variation.
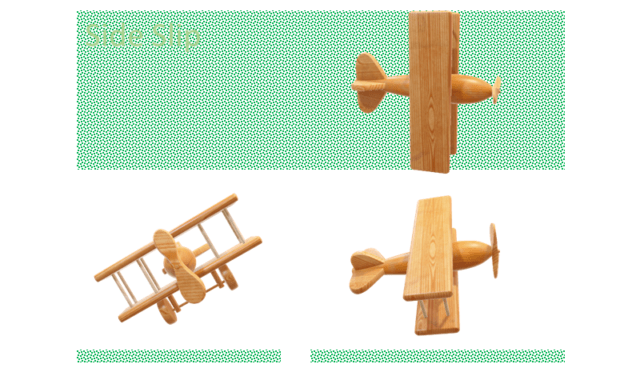
A side slip can be used to hold the aircraft over the centre line of a runway when landing in a cross-wind, or to slip the aircraft towards the centre line when necessary. The side slip can be applied further out from the runway in order to stabilise the manoeuvre, or closer in in order to minimise the effort required to control the aircraft.
Forward Slip – Decrease Altitude
The aircraft will be at an angle to the forward motion with wings level increasing resistance to cross-wind. The aileron and rudder are set to counteract each other and speed is controlled by the pitch of the aircraft.
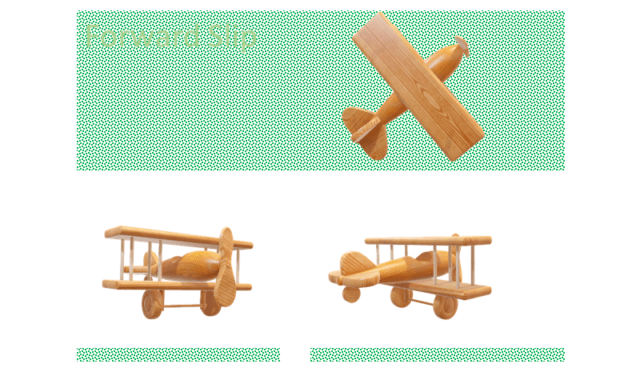
A forward slip can be used to decrease altitude without gaining forward momentum by setting the aircraft at an angle to the direction of motion, increasing drag dramatically. This is not the same as ‘crabbing’ where the aircraft is compensating for a cross-wind to achieve a course.
Landing Patterns
This is generally an oval circuit next to the runway you will be using. It may be to the left of a runway with turns to the left or right of the runway with turns to the right.
ATC Runway Instruction
The selected runway to land on will have a reference like 19L. This means use the runway that is oriented at 190 degrees as you fly in. L is short for Left and it means that the runway will be the leftmost of any other runway at the same orientation as you fly in. All of your turns in the landing pattern will also be to the left.
ILS & DME
ILS = Instrument Landing System. The aircraft needs an ILS receiver and chart info to tune and receive the data. The horizontal component of the data is sent out from a radio array at the start of the runway. It contains two frequencies, one for each side of the runway, which needs to be balanced in order to find the centre line of the runway. The glide slope is transmitted on a radio beam with a vertical spread, and this is used to ensure that you are at the correct altitude all the way through the approach. Data from an ILS array contains a Morse-code identifier so you know that you are reading the correct ILS transmitter. An ILS may also have DME.
DME = Distance Measuring Equipment used in an airport’s ILS setup. A DME equipped ILS can be used by an aircraft with a DME receiver to get an accurate value for the range of the aircraft from the runway. The ILS system will put the aircraft on the glide slope and centre line.
VOR
VOR = Very High Frequency Omnidirectional Range and it is used in navigation. GPS does a better job but is more fragile than a VOR network. A VOR station is a non-directional VHF beacon that you can fly toward and away from with accuracy. A VOR station transmits a Morse code identifier and data that can be used to calculate a bearing, normally considered to be a radial from the station location to the aircraft, with a resolution of 1 degree by convention.
Navigation is performed by referring to charts that locate the beacon, its radials and the station’s frequency. An aircraft will locate it’s destination in terms of a radial and a distance from the VOR station. Chains of stations are used o navigate for long distances.
Squawk Codes
Four digit squawk codes are assigned by ATC to aircraft in their air space to identify and track the aircraft on the ATC radar. The pilot will manually enter the code upon request via ATC voice comms and set the mode to auto. The ATC equipment will ping an aircrafts transponder continuously to obtain the squawk code, position and altitude. There are three reserved codes that indicate problems:
- 7500 – hijack
- 7600 – loss of comms
- 7700 – general emergency
The term squawk was derived from an Identification Friend or Foe system code-named Parrot.
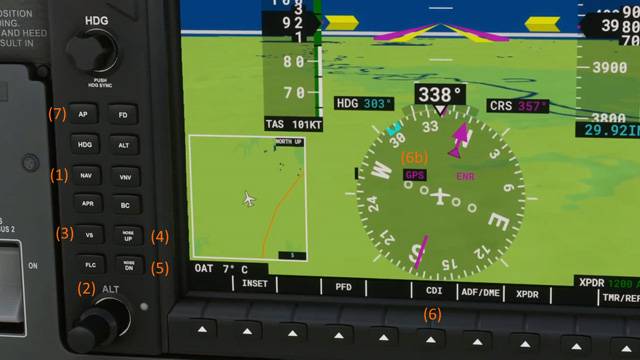
Garmin G1000 Autopilot
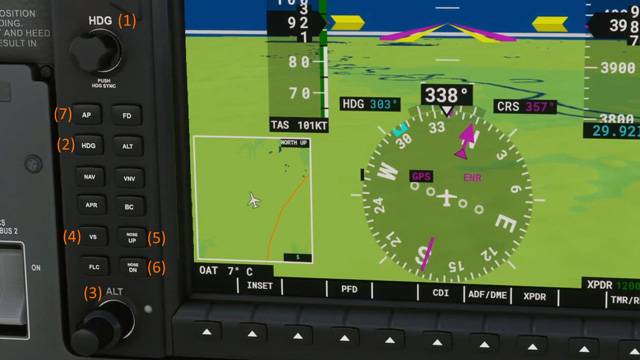
To maintain a heading and altitude:
- Select a heading (1) and look for the set value at top-left of the compass rose.
- Enable heading (2)
- Select an altitude (3) and look for the chosen value at the top of the altitude strip on the right
- Enable vertical speed control (4)
- Select climb rate (5) or descent rate (6) and look for the value at the top-centre of the display
- Engage the auto pilot (7)
To follow a flight plan:
Note: you must already have a flight plan loaded ready to be followed
- Enable NAV mode (1) and check GPS shows at centre-top of the display
- Select an altitude (2) and look for the chosen value at the top of the altitude strip on the right
- Enable vertical speed control (3)
- Select climb rate (4) or descent rate (5) and look for the value at the top-centre of the display
- Ensure the CDI mode (6) is set to GPS (6b)
- Engage the autopilot (7)
Lights, Meaning and Use
Lights are used in a practical sense to help people see you, so there will be a variation in the conventions, especially between commercial and GA aircraft.
During the day, only the beacon light is mandatory although use of landing lights and strobe lights are encouraged.
At night and poor visibility, all of the lights come into play:
- Engine off – no lights
- Engine on – NAV, beacon
- Taxi & waiting to cross runway – NAV, beacon
- Runway – strobe, NAV, beacon, landing lights
- Within 10 miles of airport – strobe, NAV, beacon, landing lights
- Flight between airports – NAV, beacon
- Within 10 miles of airport – strobe, NAV, beacon, landing lights
- Runway – strobe, NAV, beacon, landing lights
- Taxi & waiting to cross runway – NAV, beacon
- Engine on – NAV, beacon
- Engine off – no lights
NAV
These are coloured lights to help others determine the orientation of your aircraft. General aviation planes use NAV lights at night and in bad weather. Green = Right, Red = Left, White = Rear. Commercial aircraft may leave them on while the engines are running.
Mandatory Rotating Red Beacon
Beacon lights flash red and they should be on while the engines are running and for the duration of the flight. Turn on before starting the engine, turn off after stopping the engine. They will be used night and day. They may be turned off in dense fog if they impair the pilots view.
Strobe Light
Night use mandatory, daytime use optional. The strobe light is an intense white light that should be on when entering a runway, in the air and before exiting a runway. They will be off when on taxi ways. They can be turned off in dense fog if they impair the pilots view.
Landing Lights (airport)
Night use mandatory, daytime use optional. Although intended to illuminate the ground at night, pilots are encouraged to use them day or night during take-off and landing up to 10,000ft for commercial aircraft and with 10 miles of an airport.
Taxi Lights (airport)
These should be on when taxiing and off when waiting to cross a runway.
Temperature, Altitude & Ice
The ambient temperature changes by approximately 2°C per 1,000 feet altitude, with the warmest air being at sea level. If ice forms on your aircraft it will increase the weight and drag of your aircraft as well as reduce thrust and lift to a point where you will not be able to stay airborne. It is important to remove ice and to prevent it from accumulating.
You can either use a temperature gauge to drop to a warmer altitude or else drop in altitude by 500 feet until the ice begins clearing.
Note:
Although water might not freeze at high altitude due to the decreased pressure, it will become supercooled and freeze on contact with the aircraft.
Essential Settings & Binds
Essential VR Sim Settings
Currently you have to initiate VR by manually selecting VR in the Options menu. After that you can switch VR mode if you are in the Menu system, not in flight.
- General Options
- Camera
- Home Cockpit Mode = On
- Accessibility
- Cockpit Interaction System = Legacy
- Menu Tooltips = Off
- Camera
Essential VR Control Binds
These controls need to be set on your selected input device (mouse, keyboard, joystick etc)
- Camera
- VR – Camera Reset
- Cockpit Camera
- Translate Cockpit View Left
- Translate Cockpit View Right
- Translate Cockpit View Forward
- Translate Cockpit View Backward
- Increase Cockpit View Height
- Decrease Cockpit View Height
- VR
- VR – Toolbar Toggle
- VR – Activate/Deactivate VR Mode
- Menu
- Toggle Pause (freeze sim & open Options page)
- Primary Control Surfaces
- Rudder Axis
- Elevator Axis
- Ailerons Axis
- Control Trimming Surfaces
- Elevator Trim Up (Nose Up)
- Elevator Trim Down (Nose Down)
- Secondary Control Surfaces
- Spoiler Axis
- Increase Flaps
- Decrease Flaps
- Brakes
- Right Brake Axis
- Left Brake Axis
Other Settings
- World Map Filter
- Third Party Content = On (or the airports go missing)
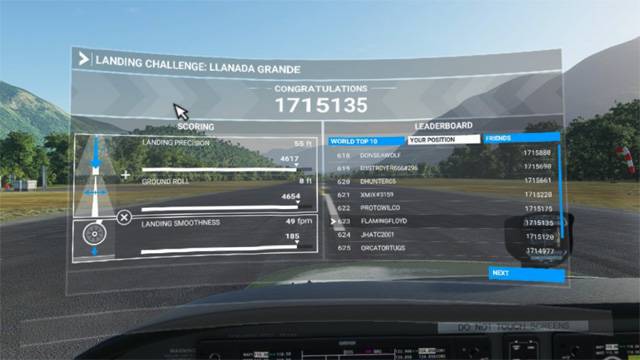
Best Landing Challenge Score
Yah, well, I’ve got to put it somewhere :0)
1.7m is th highest score I’ve achieved so far. Its a shame they don’t say how many people are in the competition in total, it could be the difference to being near the top or near the bottom of the total list.

