How to Transfer WordPress Websites
This is a rough guide showing how to transfer multiple WordPress websites from your current host to a new one.
Page Contents
- 1 Overview
- 2 Preparation
- 3 Make a Copy of Your Current Websites
- 4 Set up an Account With a New Host
- 5 Check Your Primary Domain Name
- 6 Create a New Website Shell
- 7 Access the New Website
- 8 Unable to Access the New Website?
- 9 Change The Name Servers
- 10 Ensure You Cancel Automatic Renewal Payments
- 11 How to Add a Subdomain
- 12 Adjust the Subdomain Address
- 13 Ensure SSL is Applied To All Domains
Overview

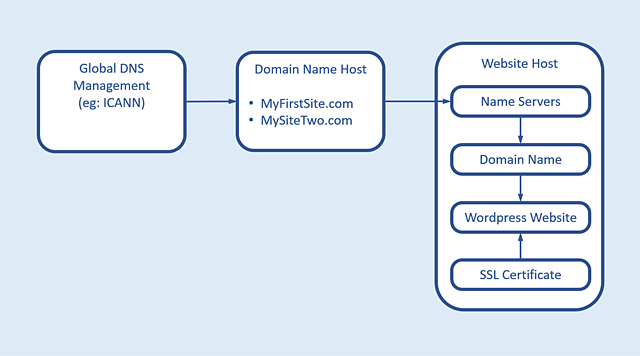
A WordPress website depends on these parts to function:
- A registered domain name
- Nameservers provided by the host to which the domain name traffic can be redirected
- A website host that supports WordPress websites
- A domain name on the host site that can capture the traffic coming from the hosts name servers
- An installed WordPress website whose name matches an attached domain name to receive the traffic from the hosts domain name.
- An SSL certificate to enforce the https: security protocol
If things go wrong
- Check that a domain name exists in your new host for each domain
- Check that an SSL certificate is working for the website
- Check your spelling of domain names
Preparation
- Transfer your domain names to an independent company such as NameSilo. That will allow you to change the name servers your domain names point to.
- Buy the All-In-One’ website backup plugin
Make a Copy of Your Current Websites
Use the All-In-One-WP-Migration plugin. It will allow you to make backups of your websites independently, and in this case transfer to another hosting company. In addition, the contents of your saved website can also be reconstituted into a WordPress site with a different domain name with no extra effort.
Tip: if you zip up the backup files they will compress to half of their size.
Set up an Account With a New Host
- Register with a WordPress website host of your choice
- Receive login details for your account
- Look for login details for cPanel
- either in your new account
- or possibly in a separate email
- ask for help if you cant find it
Check Your Primary Domain Name
The primary domain name has probably been set up for you when you created the account and specified it. Verify that it is visible via cPanel > Tools > Domains
Create a New Website Shell
When you know the domain name is present, you can create a website for it. If you create the domain name after you create the website, it might not work, so get the order right.
- Open cPanel
- Click on WP Toolkit
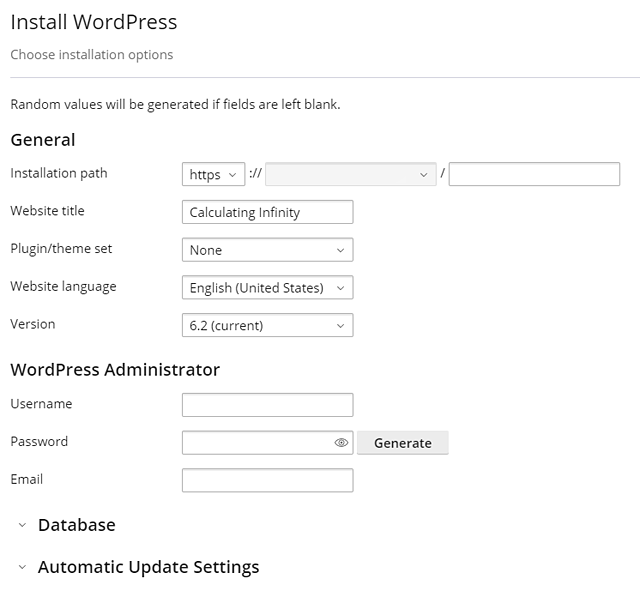
- Click on ‘Install’ to create a new website

Fill out the installation details:
- Leave the SSL access as https:
- In the ‘installation path’ the first blank box will be for your your primary domain and the second blank box will be your subdomain. The subdomain offers a way of adding additional websites to your account for no cost. Put your most important website name into the first box and leave the second box blank.
- Choose English (UK) as the website language
- Change the username and password to the versions you are already using for the website to make things easier for yourself.
- fill in the email. I use an external email service such as Gmail to stay independent of the hosts’ machinery as much as possible.
- You may see a warning telling you that the new installation will overwrite an existing installation. This is rubbish, it wont overlap unless you already created this exact installation with identical names etc. Press ‘ok’ so that the ‘install’ button at the bottom of the page is enabled.
- Press ‘install’ and wait for the website to be created
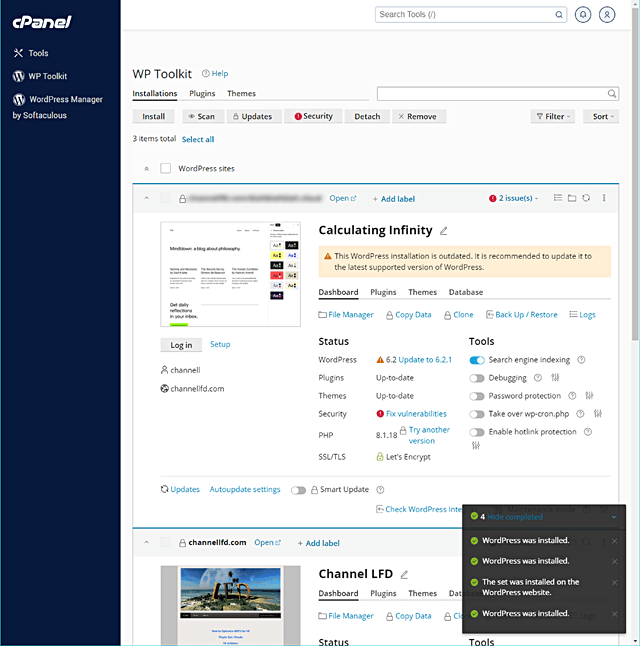
- The cPanel > WP Toolkit page updates with your new details
This screenshot shows a domain and subdomain (blurred out) so yours will just show one of these boxes.

Access the New Website
What you will want to do is to access your new website whilst your current website is still running as usual. To do that you will need to access the website privately.
- You may be able to go to your new website directly by pressing the ‘log in ‘ button on the ‘cPanel > WP Toolkit’ page.
- Failing that, sometimes the new hosting company will provide a link to the new website that works because it is tied as a subdomain of the host temporarily.
- Sometimes you will have to tell your own computer where the new website is privately by modifying your hosts file for a while.
Unable to Access the New Website?
If you cant log into your new website, you can redirect your computer to find it by modifying the hosts file. Keep a copy of the file safe so you can restore your computer back to its original state.
Modify the Hosts File
If you can’t access the website, you will need to ask for the host address required from customer support. When you have that, you can find the ‘hosts’ file in:
C:\Windows\System32\drivers\etc
Make a copy to store safety then edit it to include two versions of the name you are trying to connect to. One is preceded with www and the other is not. This is just a precaution to ensure you get through. For example:
5.67.33.168 mywebsite.com
5.67.33.168 www.mywebsite.com
In this example, the whitespace character between the number and the name is a TAB character.
Save the host file.
Now try typing your domain name into a browser and press return. You should see either a WordPress website (good) or a page created by the server (not good) or a warning for an HSTS error.
Fix an HSTS Error
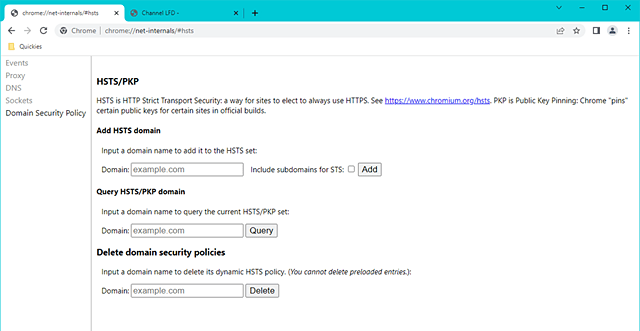
An HSTS error is related to security. What you will need to do it eliminate the security policy temporarily. Open the Chrome browser and in the address bar type : ‘chrome://net-internals/#hsts’

Find ‘Delete domain security policies’ and in the domain text box type your domain and hit the delete button. Open a new tab and type your domain name once more and if all the spellings are correct you should now see the website page.
Log Into the New Website
Now add ‘/wp-admin’ to the website domain name (without the quote marks) in the address bar and hit return in order to bring up the WordPress login boxes. Log in and go to the plugin page, delete the existing plugins an add the ‘All-In-One’ plugins. When they are established you can upload a copy of your website.
Remember to Restore Your Hosts File
If you modified the hosts file you should remember to restore it after you have finished setting up the new website.
Change The Name Servers
When all is well you can go back to your domain names and change the name servers to point to your new host. That wont work very well if your old host has control of them and your account expires. Move them out of there before you start the transfer.
Ensure You Cancel Automatic Renewal Payments
If your transfer has been successful you should then cancel any automatic renewals to make sure you don’t have that headache.
How to Add a Subdomain
Before you begin, make sure first to add a domain name to your new hosts account as described elsewhere. You cannot successfully add it afterwards.
To add a second website into your account, it will need to be a subdomain. From the outside you will not be able to tell the difference, but from the inside the address you want will be preceded by the primary domain name, for example: https://MyPrimaryWebsite.com/MySecondWebsite.com
This address will be sorted out at the end so that it looks normal.
- Ensure the correct domain name exists in the new host before you start.
- Open cPanel
- Click on WP Toolkit
- Click on ‘Install’ to create a new website
- In the ‘installation path’
- Leave the installation as https:
- In first text box type your primary website (eg: MyPrimaryWebsite.com)
- In the second text box type the website you want to create (eg: MySecondWebsite.com)
- As before, set the language and put in the username and password you usually use
- Press the install button and wait until you get feedback that it has completed.
- When it has installed, you can follow the previous steps to access the new website, except that when you modify the hosts file, you will only put in the name of the new website and not mention the primary name.

Adjust the Subdomain Address
If everything worked properly you can now access the new website via its extended name, for example:
MyPrimaryWebsite.com/MySecondWebsite.com.
In order for the website to be accessed with just its own domain name you will need to log into the website then open the dashboard and look for the ‘settings’ menu item.
Open settings and find the ‘WordPress Address (URL)’ and the ‘Site Address (URL)’ entries. They will contain the combined address, so delete the primary domain name, leaving the domain that you are interested in.
Press ‘Save Changes’ at the bottom of the page. If there are problems, such as a free SSL certificate is not applied, the web page might appear but be blank, or have missing images.
Ensure SSL is Applied To All Domains
To ensure that a free SSL certificate is being applied to all your domains:
- Log into cPanel then find and click on the item ‘SSL/TLS Status’
- Click the blue button that says ‘Run Auto SSL’
- A free SSL certificate will be applied to all the domains on your account
